Application Store - Document Management 3.0
1. Licensing and import
All information about licensing can be found here. All information about importing applications can be found here.| Please note that the documents that are placed in the Document Management are stored on the Intrexx server. Therefore you will need to ensure that there is sufficient storage space available on the server. The amount of space used depends largely on the size of the current set of documents, together with those that will be subject to revision. |
The download package contains the following files
- DMS3_6000.zip for Intrexx 6 versions
- DMS3_7000.zip for Intrexx 7 versions
- DMS3_8000.zip for Intrexx 8 versions
2. Features
Document Management allows you to edit and publish your documents in a flexibly configurable review and approval process. All documents can be clearly classified into a directory structure, from which they can be quickly found and retrieved. If required, PDF copies can be generated automatically from the permitted source documents. Seamless processing steps between editing and controlling guarantee that your documents will be of the highest possible quality.3. PDF generation
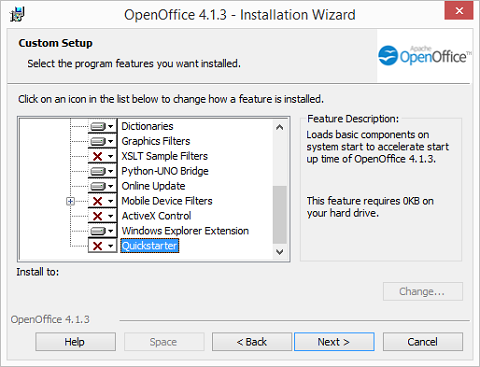
3.1. OpenOffice
OpenOffice (Version 3.0 or better) or Microsoft Office (Version 2007 or better) must be installed on the Intrexx server in order to create a PDF file.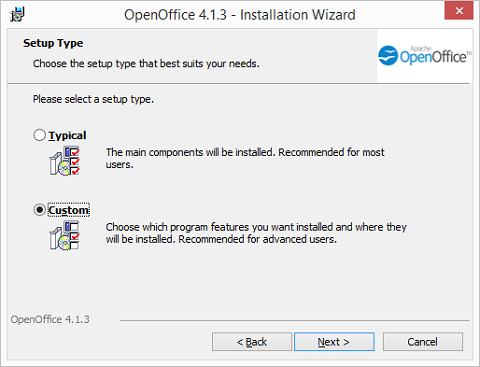
Please note when installing OpenOffice that you should select the Custom setup and disable the Quickstarter option, which can be found in the list of optional components.
3.2. Microsoft Office
If Windows 2008 Server is being used, then the following directories must be created:-
Microsoft Windows 2008 Server x64
c:\Windows\SysWOW64\config\systemprofile\Desktop -
Microsoft Windows 2008 Server x86
c:\Windows\System32\config\systemprofile\Desktop
- Create a local user on the server with administrative permissions
- Add this user to the local administrators group
- Change the user for starting the Intrexx portal service to the new local user
- Change the identity of the DCOM service from MS-Office to the new local user
- Switch the user for starting the Intrexx portal service to this new local user
In the DCOM Config, right-click on the Microsoft Word 97-2003-Document entry and select Properties from the context menu.
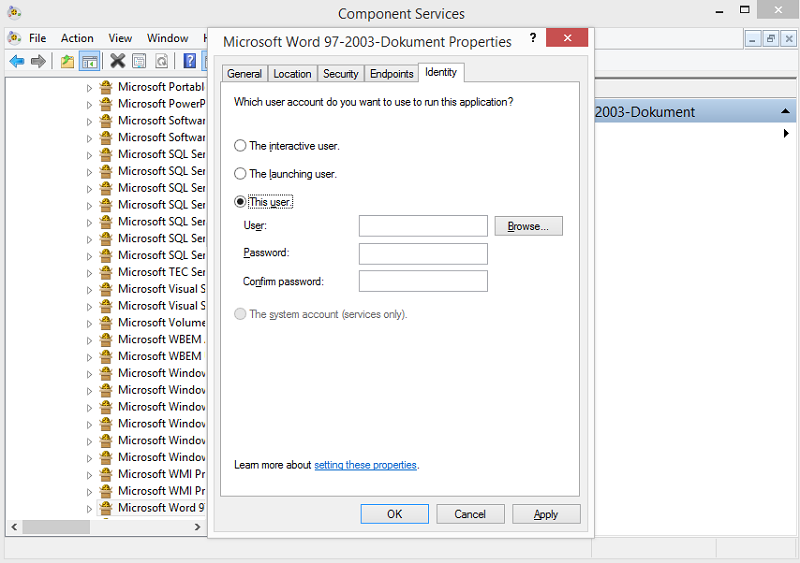
Switch to the Identity tab and enter the previously created user and password. If there is no entry for Word in the Component Services, please run mmc comexp.msc /32.
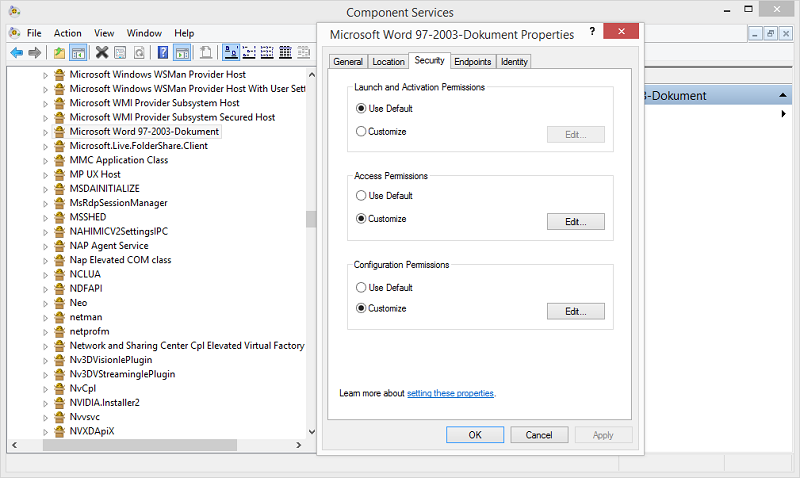
Add the user on the Security tab in the Access Permissions and Configuration Permissions.
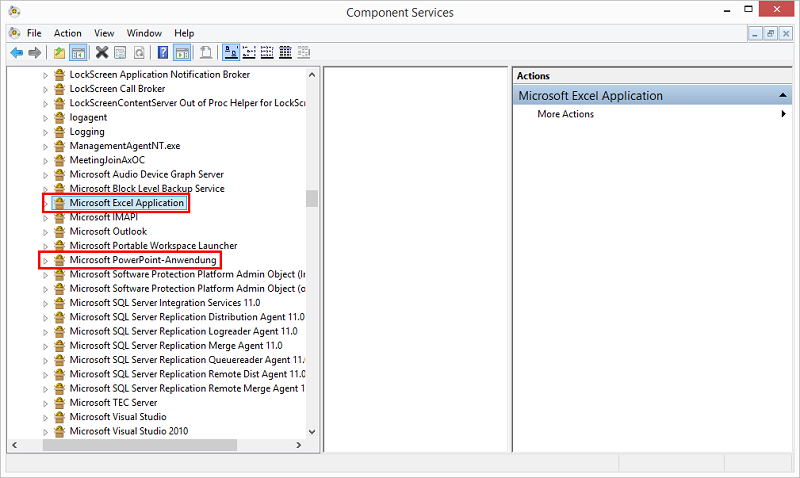
Apply the same change for Excel and PowerPoint. This change only needs to be made for PowerPoint if it is installed on the server.
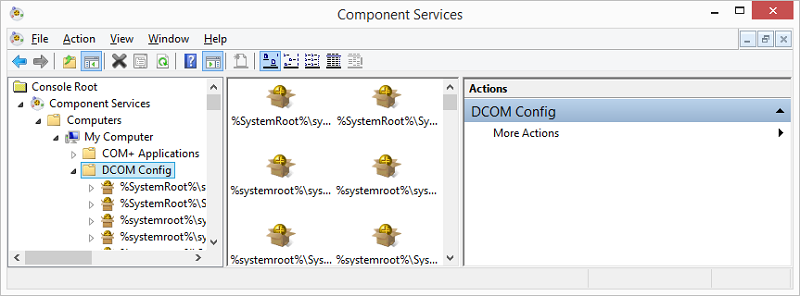
4. Add new local user to the COM-security for the local machine
To obtain the full benefit of the processing capabilities of the Document Management, and the automated email notifications, e.g. referring to new documents in the approval process, please activate the Email Service in the Tools module. To create a new local user open the Component Services from the Start menu, Run / dcomcnfg. Double-click on the entry Computers on the right-hand side.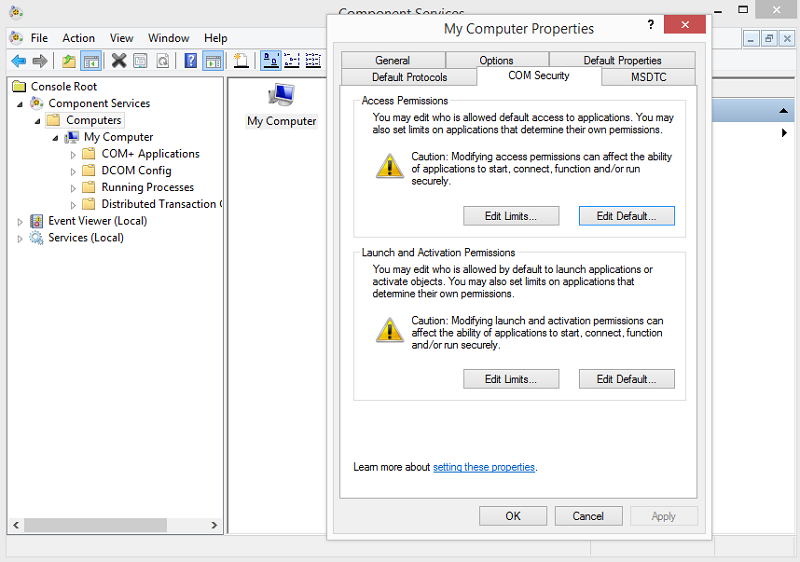
Right-click on My Computer in the left frame and select Properties. Switch to the tab COM Security. Clicking on Edit Default will allow you to adjust the Access Permissions and the Launch and Activation Permissions. We recommend the following permissions: Local Access and Remote Access, as well as Local Start, Remote Start, Local Activation and Remote Activation. If it's still not possible to create a PDF file after this setup, please check the following points:
- If a message appears when opening the document, then you should revise the document accordingly.
- The document cannot be created if it's damaged, password-protected or write-protected.
- The document is considered to be dangerous. Save the file as a suitable file format (i.e. docx or xslx), which won't be security checked.
5. Permissions
In DMS 3, there are three user groups, which have been provided with different permissions:-
DMS-Adminstratoren (Administrators)
Read and write all documents, configure settings. -
DMS-Lenkungsmitglieder (Controlling)
Read documents that the group members need to examine or release. -
DMS-Redaktion (Editing)
Read documents for which group members have been assigned responsibility.
| In order to ensure that documents are not visible in the directory, but only in the overview of documents or accompanying documents in the corresponding tables, a parent folder without permissions can be created that does not appear in the directory. In this folder, subfolders with the appropriate permissions can now be created. The relevant documents can now be added to these folders, and be made available to users. This process is necessary to ensure that users do not have access to documents that are not intended for them. |
Assign the corresponding users to these user groups. As soon as a user is made a member of one of these groups, they will have the appropriate access rights within the Document Management.
6. Help
If you see this symbol7. Settings
To work with Document Management, first log in to the portal as a member of the Administrators user group. You will then have access to the Settings menu item.7.1. System settings
The system settings can be found here that are used to define the fundamental procedures in the Document Management.
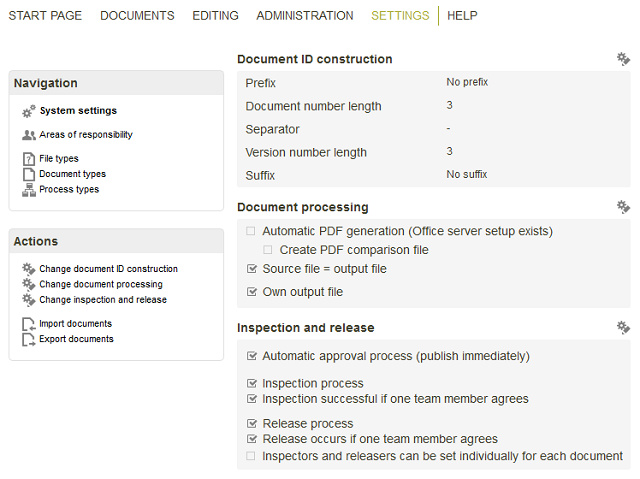
7.1.1. Construction of the document ID
The document ID is an identifier, with which each document in the Document Management can be uniquely identified. It is composed of a number of different parts. Click on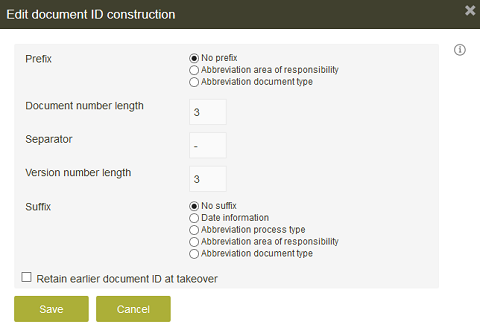
Prefix
Defines the series of characters with which the document ID should start. The following options are available:- No prefix
- Abbreviation area of responsibility
- Abbreviation document type
Document number length
Defines how many characters the document number consists of.Version number length
Defines how many characters the version number consists of.Separator
Enter a character of your choice which will be used as a separator.Suffix
Is added to the end of the document ID. The following options are available:- No suffix
- Date information
- Abbreviation process type
- Abbreviation area of responsibility
- Abbreviation document type
Retain earlier document ID at takeover
You can specify a custom ID in a separate field when a new document is created, for example, from an old document management. This ID will also be taken into account in the search function, so that old documents can still be found from the old ID.7.1.2. Document processing
In this area, the type of the output file, and the permitted source and output documents are defined. By clicking on
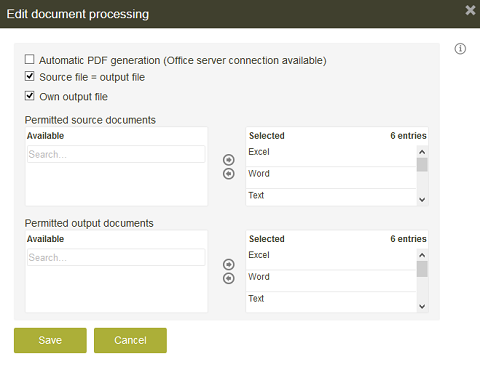
Output documents are the files, to which the users in Document Management have access in the Documents menu item. Source files are only available to the editors.
Automatic PDF generation (Office server connection available)
This setting gives the editors the ability to allow the automatic generation of PDF files from their Word, Excel or PowerPoint documents. If the Create PDF comparison file option is selected, a comparison file between two versions of a document will be created (only for text files).Source file = output file
Has the effect that an editor can select this option when creating a new document. In this case, a copy of the source file will be created as the output file. Both files are therefore identical.Own output file
Has the effect that the editor can, in addition to the source file (e.g. a Word document) also upload their own output file (e.g. a PDF created by themselves). If this setting is selected, then two files must be uploaded.At least one of the settings described above must be selected. If several settings are selected, then the editors can select from any of the options specified here when creating new documents. In the lower section of this window, the permitted source and output file formats are specified. Normally the PDF format will be used as the standard output format. In both lists you can select from the defined file types.
7.1.3. Inspection and release
The settings for the inspection and release process can be edited by clicking on
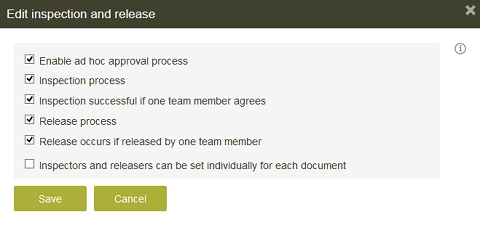
Here you can control the settings which influence the various stages in the processing of a document.
Enable ad hoc approval process
Enables the editor to release the document themselves, without putting it through the release process. In this case, they must select at least one releaser. If the editor is a member of the DMS-Controlling group, then they can select themselves as the releaser.Inspection process
If this setting is activated, then the release process will automatically be activated. This setting results in a two-step approval process.Inspection successful if one team member agrees
Means that a document has passed the inspection when just one member of the respective inspection team has indicated approval.Release process
If this setting is activated, without the Inspection process, then the approval process will consist of just the one step. If neither of the two settings is activated, then the document must be released immediately by the editor.Release occurs if released by one team member
Means that a document has passed the release process when just one member of the respective release team has indicated approval.Inspectors and releasers can be set individually for each document
If this option is activated, then the editor can select the inspectors and releasers freely from the members of the DMS-Controlling group.7.2 Areas of responsibility
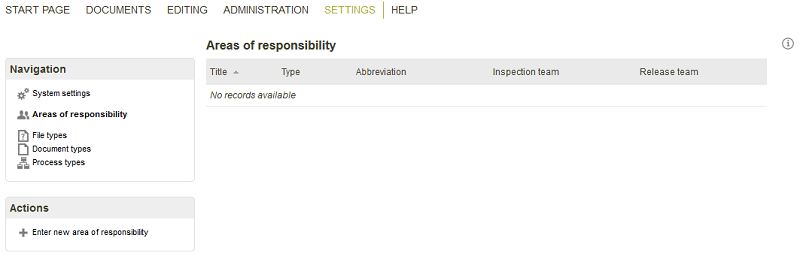
Here, you can specify who will be responsible for the inspection and release of the document. In the Actions area, new areas of responsibility can be created.
Opens a dialog where a new area can be entered.
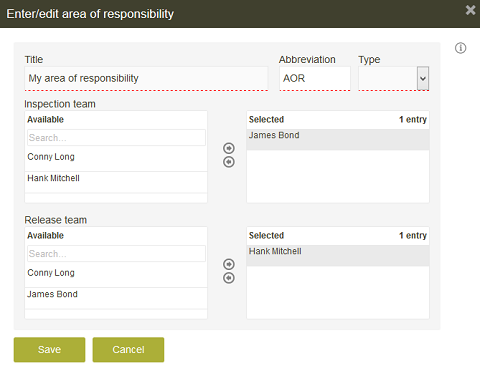
Title / Abbreviation
Enter a Title and Abbreviation for the new area of responsibility.Type
Here, you can define whether it is a Section or Department. (Please note that the default data supplied will have the German equivalents, Bereich and Abteilung respectively).Inspection / Release team
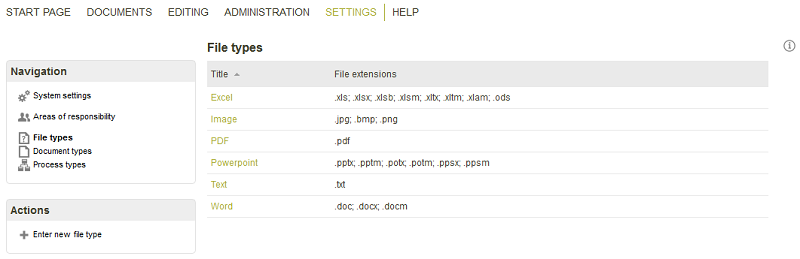
All members of the DMS-Controlling group are available for selection here7.3. File types
Opens a dialog where a new file type can be added.
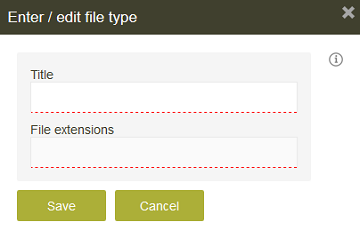
Title / File extensions
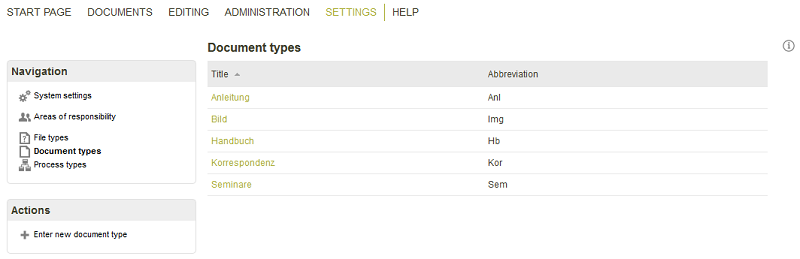
Enter a title and the corresponding file extensions here. New file types must then be added in the Document processing to the list of permitted documents.7.4. Document types
Opens a dialog where a new document type can be added.
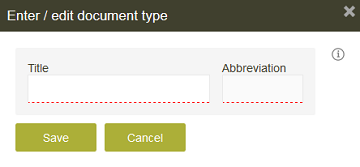
Title / Abbreviation
Enter the title and abbreviation here.7.5. Process types
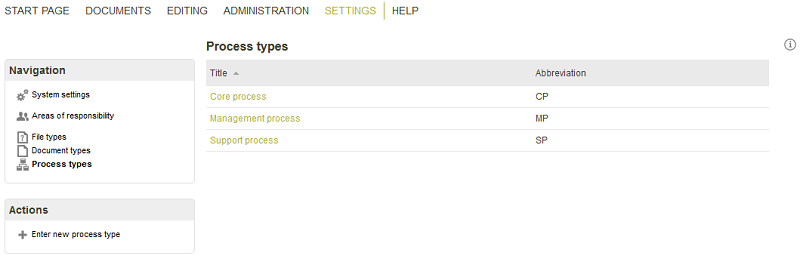
In the Document Management, different types of processes can be assigned for the categorization of documents:
Management process
Management processes are defined as those which have a command or decision making character (e.g. business planning processes).Core process
Core processes are defined as those which are directly related to the corporate purpose of the business and contribute to its success. They create value – directly or indirectly. The process begins and ends with the customer (e.g. services or support).Support process
Support processes are those that have no direct value creation features and for which the customer does not usually pay, but which are important to the business (e.g. cleaning and decoration of a sales area).| Please note that the default data supplied with the Document Management is in German. The three data sets can be edited or replaced by clicking on the respective titles. |
Opens a dialog where a new process type can be added.

Title / Abbreviation
Enter the title and abbreviation here.8. Administration
Members of the DMS Administrators user group have access to the Administration menu item. At the top of the left hand column of this page, you will find the Navigation panel.
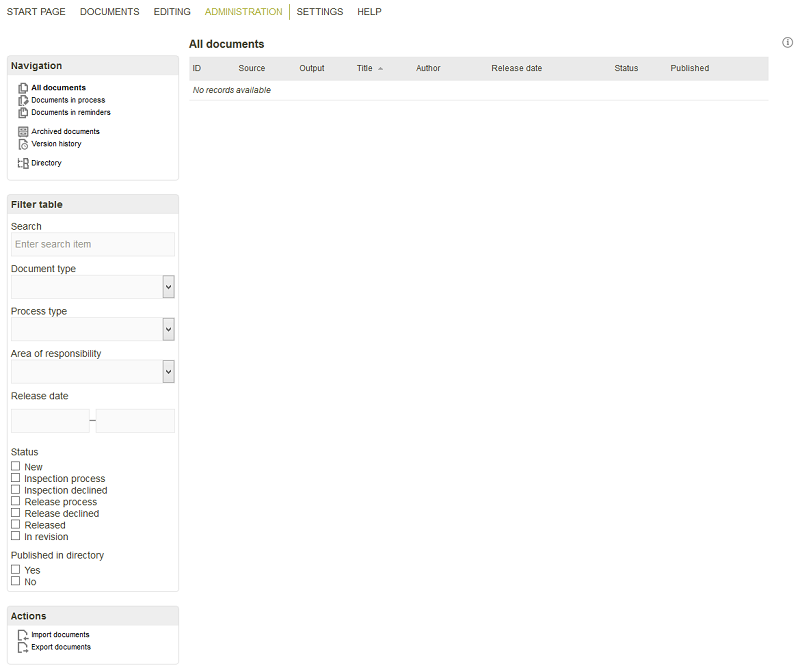
8.1. All documents, Documents in process, Documents in reminders, Archived documents and Version history
Displays the data in the corresponding view in the right hand panel. In the version history, all documents and versions will be listed, sorted by the latest change date. In all of the other views, only the current released version, or the version currently being processed, will be displayed.8.2. Directory
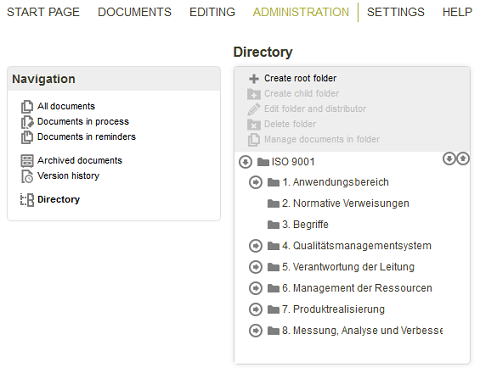
Here, you can edit the directory structure in which the documents will be organized. The directory ISO 9001 includes a ready-made example structure, which you can edit or replace using the symbols above the directory structure, as required.
| Please note that the example directory structure under ISO 9001 is supplied in German, but can be edited as described above. |
Opens a dialog where a new folder can be created at the top level.
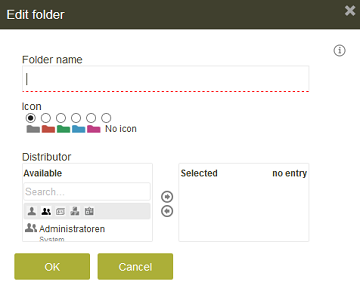
Folder name
Provide the folder with a name here.Icon
Select an icon for the new folder here.Distributor
For every folder at the top level, you can select the user groups which should receive the access permissions to the corresponding folder and the documents that it contains under Distributor. Folders at lower levels in the structure can also inherit distribution settings from the parent folder.Opens the same dialog as above where a new folder can be created as a subfolder of the currentl selected folder.
The currently selected folder can be edited.
Deletes the currently selected folder.
To manage documents, select the desired branch in the directory structure and then click on Manage documents in folder.
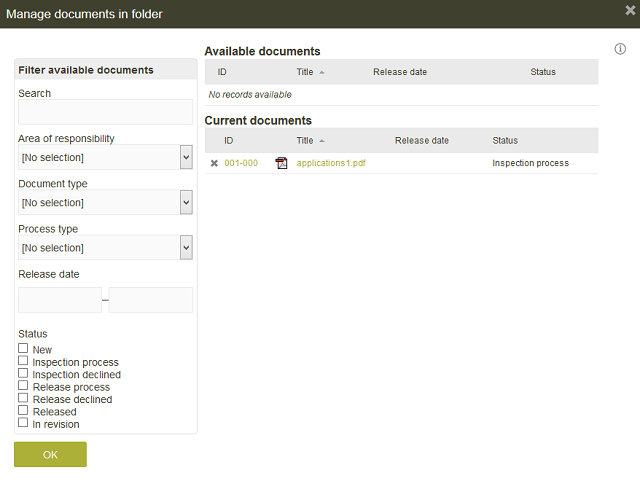
Current documents table
All documents which have been published in the currently selected folder are listed here.Removes the document from its publishing location. It will no longer appear in the corresponding folder, but will be displayed here under Available documents.
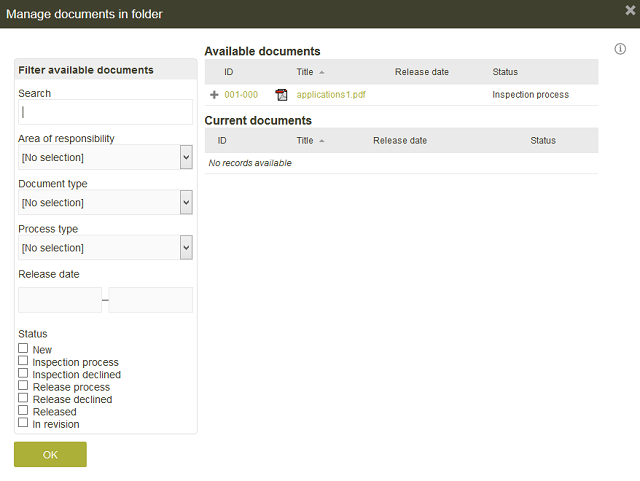
Available documents table
All documents which can be added to the currently selected folder are listed here.Publishes a document to the currently selected folder. It will then be displayed in the Current documents table.
Filter available documents
You can filter the tables on the right with various criteria. Enter the appropriate terms in the search fields or choose from the selection lists. The documents can also be filtered by status. Simply click on the required checkbox(es).-
New
New documents or versions, for which the release process has not yet been started -
Inspection process
Documents which are currently being inspected -
Inspection declined
Documents which have failed the inspection -
Release process
Documents which are currently in the release process -
Release declined
Documents for which release has been declined -
Released
Released documents -
In revision
Released documents for which a new version has been created
8.3. Actions
8.3.1. Import documents
Documents contained in a ZIP file can be imported here.
Click on the Import documents link at the bottom of the Administration page.
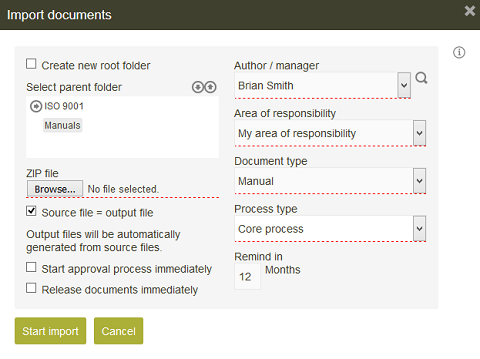
Create new root folder
With this setting, the directory structure that is packaged in the ZIP-file will be created in the root folder of the DMS during the import. The title of the folders will be taken from the ZIP-file.Select parent folder
Alternatively, a folder from the directory structure can be selected here.ZIP file
Select the import file here.Source file = Output file
The setting here is dependent on the settings defined in the system settings.Start approval process immediately
The members of the inspection and/or release team, depending on whether a single-step approval process is in place, will be notified immediately, that there is a document awaiting inspection. The document can then no longer be changed by the editor. If the setting has not been activated, then the document can still be edited, and the release process can be started later from the Start approval process action.Release documents immediately
The documents will be released immediately after they have been imported. If the Enable ad hoc approval process option is activated in the Inspection and release settings, the editor of the document can also release it themselves (without going through the approval process), if this setting is active here. In this case, the editor must select at least one releaser.Area of responsibility
Defines who is responsible for the release of the document.8.3.2. Export documents
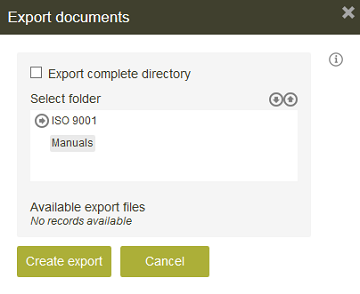
Export complete directory
A ZIP-file will be generated, which contains all of the documents in the directory and applies the folder structure. If the setting is not activated, individual branches of the directory can be selected and added to the ZIP-file.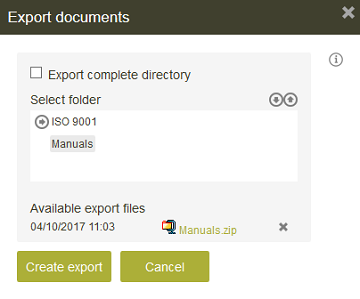
A link to the ZIP-file containing the exported files and folders, with the date, will be displayed at the bottom of the window.
9. Editing
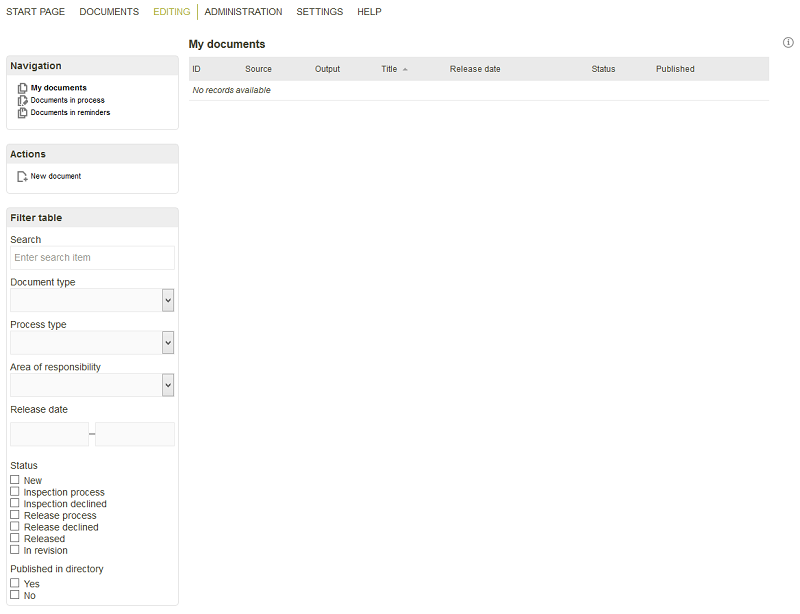
My documents, Documents in process and Documents in reminders
Click on this link to display the corresponding documents in the table on the right.9.1. New document
Opens a dialog where a new document can be added to the Document Management.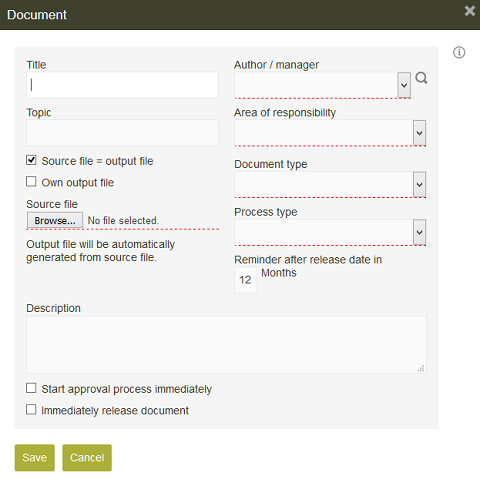
Title / Topic
Enter the corresponding terms here.Browse
The document can be uploaded here.Author / Manager / Area of responsibility
Select the respective people responsible.Document type / Process type
Assign the document and process type.Reminder after release date in
Enter the number of months that should elapse between release and resubmission – the default is 12. The resubmission date will be displayed in all appropriate tables. An Intrexx Share Plugin is already configured in the Document Management; this automatically creates a reminder for the author one month before the resubmission date.Description
A description for the document can be started here.Start the approval process immediately
Starts the release process.Immediately release document
The document is released automatically.Transfer document to the PVP
This setting is available if the Intrexx Process Visualizer is installed on the portal. The document will automatically be created in the Intrexx Process Visualizer.
My documents table
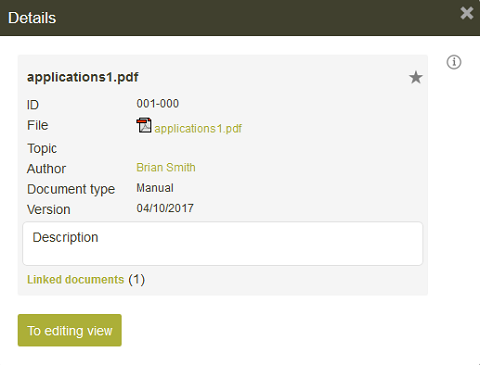
The saved document will now be displayed here. The document ID will be generated automatically. You can click on the title of the document in the table to see information on the status and other details of the document.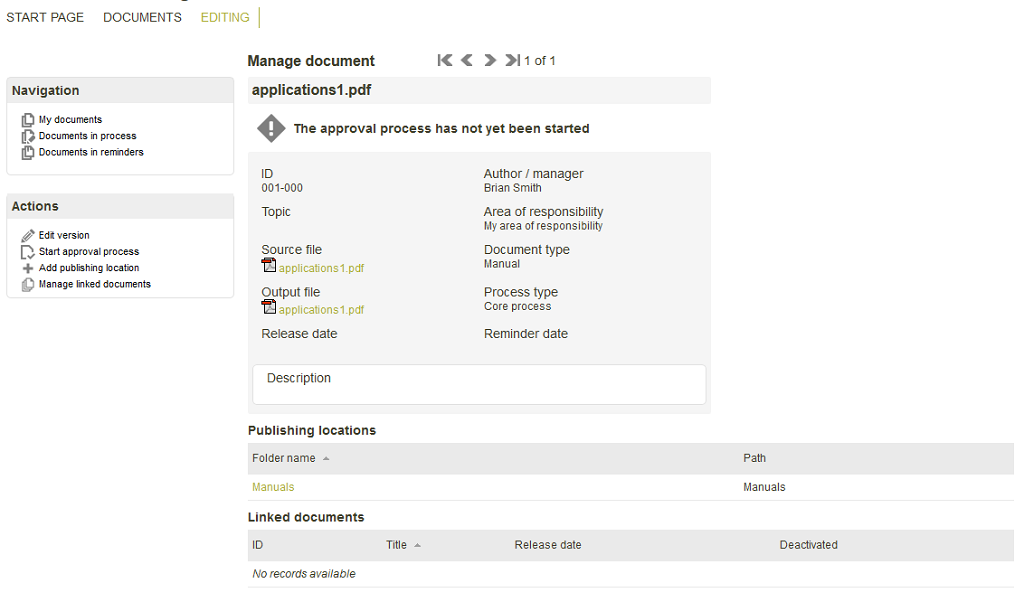
Publishing locations tab
Here you will see a listing of the folder names, from the directory structure described above, in which the document has been published.Linked documents table
Here, all of the documents which have been linked to the current document are listed.Linked processes (Process Visualizer)
This table is available if the Intrexx Process Visualizer is installed on the portal. Here, the respective processes from the Intrexx Process Visualizer,, in which the document is integrated, are shown.9.2. Edit version
This action is available as long as the release process has not yet been started. After release, only the metadata of a document can be edited; the document itself is locked to prevent any further editing.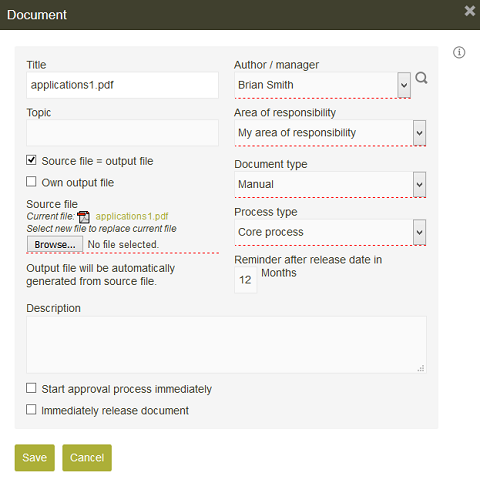
The metadata, that has been stored for the document, is entered here automatically. Depending on the system settings, the procedure for the creation of an output document can be changed here.
9.3. Create new version
A new version can only be created for a document that has already been released or with the corresponding permission for archived versions. A new Document-ID will be generated for a new version. In the tables where documents are listed, the latest released version of a document is displayed.9.4. Revise declined version
If a version/document was rejected at the inspection or release stage, it can be revised for resubmission. The inspection and release will be deleted, and the release process must be started again.9.5. Extend release
If the resubmission date for a document will be reached within one month or less, the release can be extended via this action.9.6. Edit metadata
This action allows you to edit the general data of the document – e.g. title, topic, process type, etc. The metadata of documents that have already been released can also be edited.9.7. Start approval process
This action opens a page which contains an overview of the members of the inspection and release teams for the selected area of responsibility.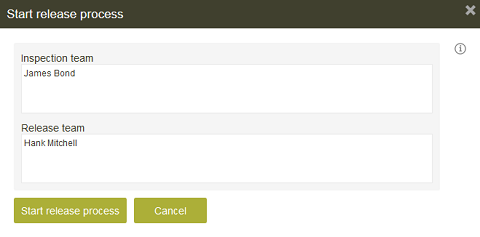
The members of the inspection team will receive an email, informing them that a document is waiting to be inspected. The members of the release team will be similarly informed via email, when the inspection has been completed successfully. If the Inspectors and releasers can be set individually for each document option has been activated, the inspection and release teams can be edited at this point.
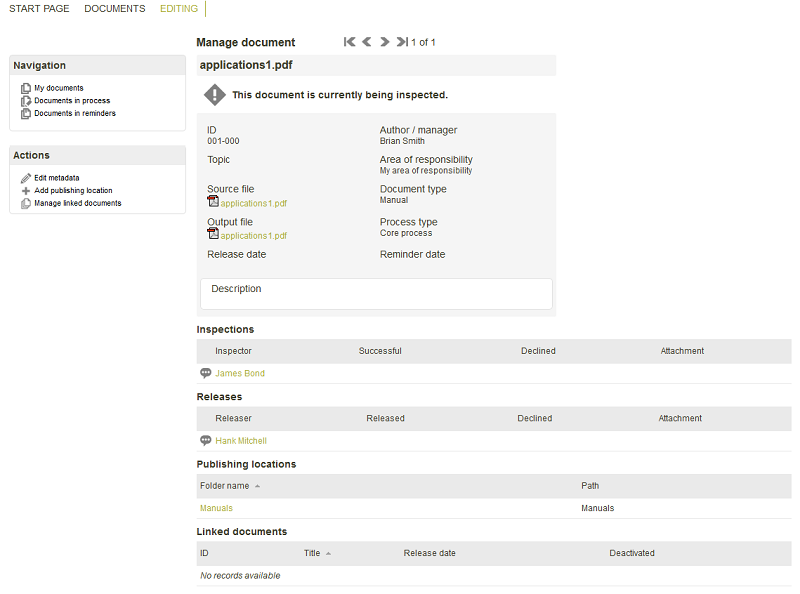
If the release process has been started, the document will be displayed in the Inspections table. The name of the inspector is also a link to display additional information, e.g. their contact data.
All of the comments made by the inspector are shown here.
9.8. Add publishing location
The document can be placed in the directory structure using this action.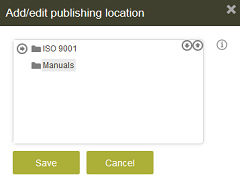
All documents can be published in as many directory folders as required. The publishing location can be changed, by clicking on the folder name in the table. If a document does not yet have a publishing location, despite having been released, it will not be displayed in the tables or in the directory. Users can only see the documents which have been published to a folder to which they have permission; these are assigned in the folder's Distributor list.
9.9. Linked documents
Documents which are referred to from the current document can be assigned to the main document as linked documents.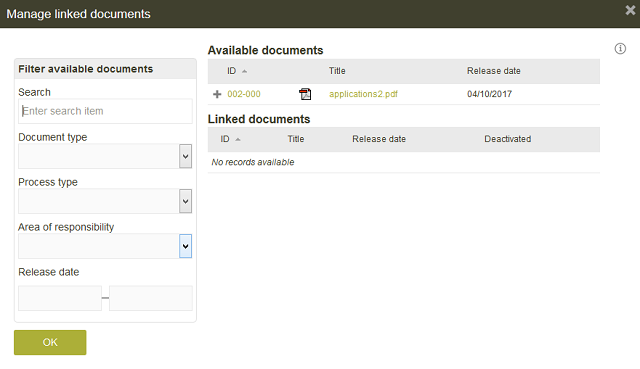
Available documents table
All of the potential documents for the linking are listed here.Moves the selected document to the Linked documents table.
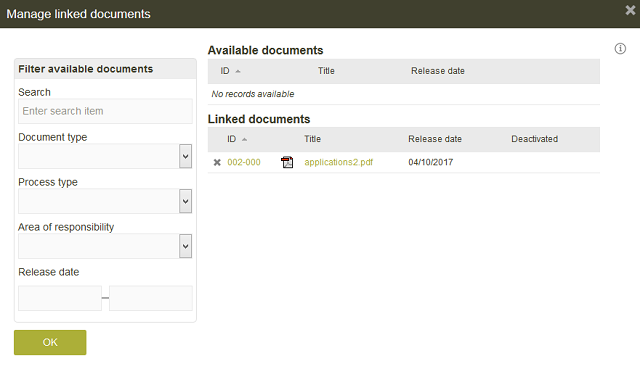
Deletes the linking to the current document, and removes it from the list.
| Linked documents must also be published in a folder. Every user can only see the documents for which they have permission. |
9.10. Deactivate document
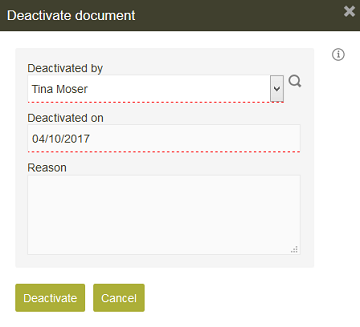
Documents are deactivated with this option. They will then be hidden in the directory and every table that lists valid documents. DMS Administrators can see a list of all deactivated documents in the Archived documents list.
Deactivated by
Choose the user who is responsible for the deactivation.Deactivated on
Will automatically default to the current date, but can be changed if required.Reason
Enter a reason for the deactivation.| It is not possible for deactivated documents to be reactivated. Members of the DMS Administrators user group can create a new version of a deactivated document, and then assign an editor to be responsible for it. |
9.11. Show inspections and releases
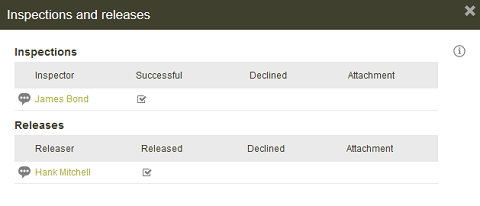
With this action, all of the members of the inspection and release teams, w ho have processed the current document, will be displayed, together with the results of this process.
9.12. Show all versions
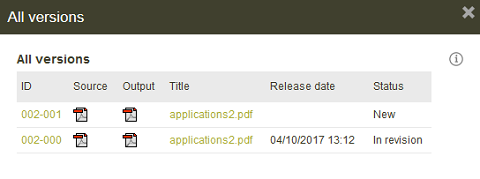
Displays all versions of a document.
10. Inspection
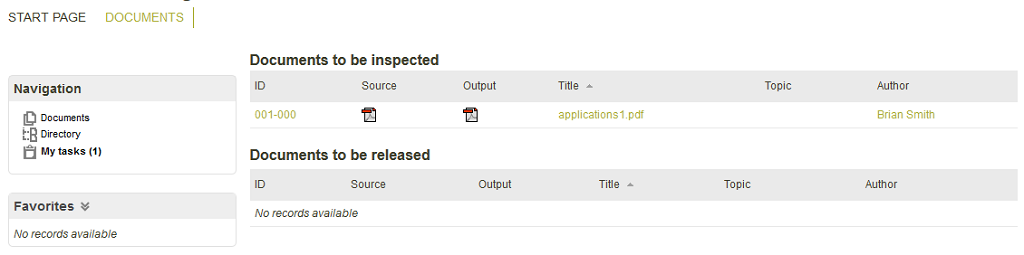
Members of the DMS Controlling group, who have been selected as inspectors of a document, will see the additional link My tasks in the menu item Documents menu. The number of pending tasks will be displayed in the link. Here, all documents, which need to be inspected or released, are listed. A click on the link of a document that is awaiting inspection will open the detail view of the document.
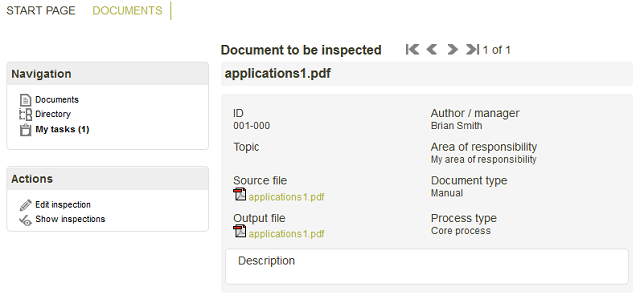
The inspection can now be started from the Edit inspection action.

If required, comments and a file attachment can be added here. The inspector can approve or reject the document via the corresponding buttons. If they agree, and if they are the only inspector, or the option Inspection successful if one team member agrees is activated in the settings, then the inspection will be recorded as completed. If the inspector rejects the document, the editor will be informed by email. The document will then have the status Inspection declined. The editor can reset the release process with the Revise declined version action, and restart the process for the revised version of the document. The document will now be shown with the status Release process on the page of the respective editor.

If the editor clicks on the title link, he will open the detail view of his document.
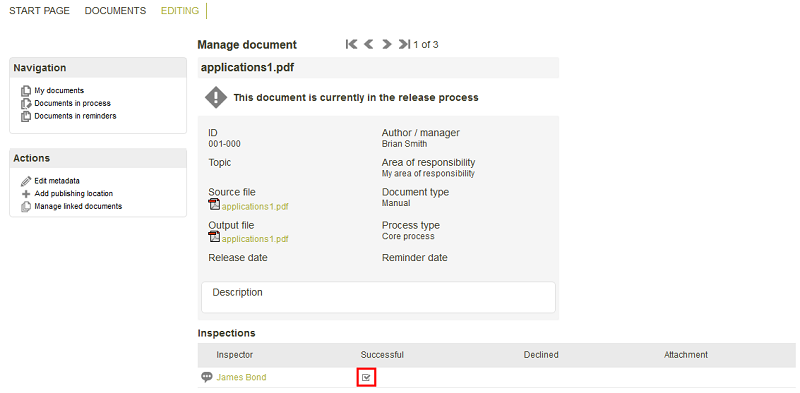
The document is now marked as Successful in the Inspections table. An Intrexx Share plugin is already configured in the Document Management. This will automatically create a post as soon as a document needs to be inspected. Another pre-defined plugin will create a post as soon as an inspection has been declined.
11. Release
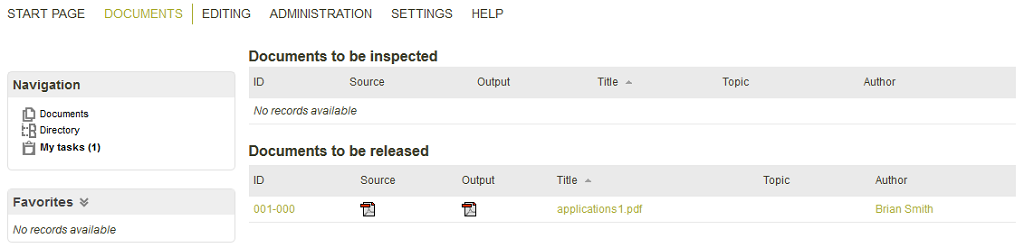
Members of the DMS Controlling group, who have been selected as responsible for the release of the document, will find an additional link My tasks in the Documents menu item. The number of pending tasks will be displayed in the link. Here, all documents which need to be inspected or released are listed. A click on the link of a document awaiting release opens the detail view of the document.
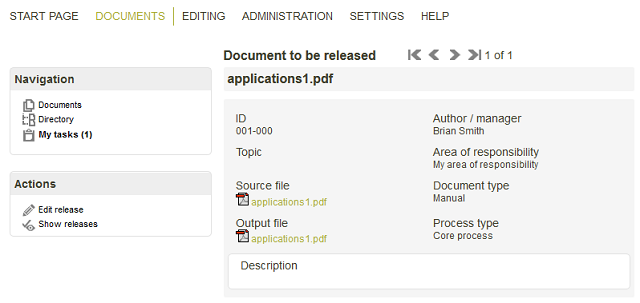
Edit release
Starts the release process.
If required, comments and a file attachment can be added here. The releaser can approve or reject the document via the corresponding buttons. If they agree, and if they are the only releaser, or the option Release occurs if one team member agrees is activated in the settings, then the release will be recorded as completed. If the release is declined, the editor will be informed by email. The document will then have the status Release declined. The editor can reset the release process with the Revise declined version action, and restart the process for the revised version of the document.
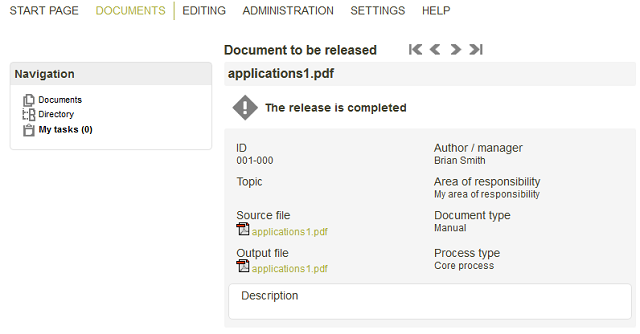
The corresponding task is now completed.

The document is now marked as Release in the My documents table of the respective editor. An Intrexx Share plugin is already configured in the Document Management. This will automatically create a post as soon as a document needs to be inspected. Another pre-defined plugin will create a post as soon as an inspection has been declined.
12. Documents

All released and published documents can be accessed from the application menu item Documents. The menu is available to all users. However, the users can only see those documents for which they have the appropriate permission. The table with the list of documents can be filtered by Document ID, Title, Topic, Document type and Version in the Filter table area. A click on the title link opens the detail view of a document.
The document can be downloaded and then edited by clicking on the file symbol.
Frequently used documents can be added to the Favorites area.

Removes a document from the favorites.
An Intrexx Share plugin is already configured in the Document Management. This will automatically create a post as soon as a document is released.
Directory
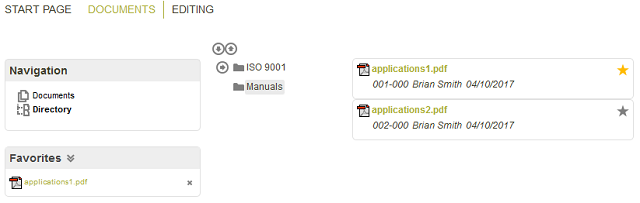
The directory structure can be displayed by clicking on the Directory link in the Navigation panel. Here as well, only documents that have been released and published will be displayed. Additionally, the current user must be a member of the distribution list for whom access permission to the appropriate folder have been granted on the Administration page. A click on a folder will display all of the released documents that have been published there. Here as well, documents can be added to favorites. A click on the title link of the document opens the detail view.
13. Full-text search
A full-text search makes it possible for the user to search through all stored documents (pdf, ppt, doc, txt etc.). In this search, all documents, for which the current user has access rights, and which have been published in the directory, will be taken into account. The search page can optionally be added to the application menu.14. Office integration
If you open the Document Manager in the Applications module in the Portal manager, you'll find the following pages in the Documents data group:- Office Integration PDF
- Office Integration PDF or Source
- Office Integration Source
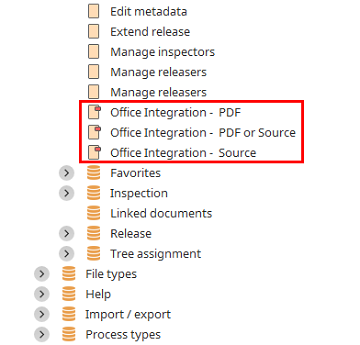
Depending on which options are available to the editors for creating the output file, different pages are more suitable for the Office integration:
-
Automatic PDF generation and Source file = Output file activated
The Office Integration – PDF or Source and Office Integration – Source pages should remain activated. -
Only Automatic PDF-generation activated
The Office Integration - PDF page should remain activated. -
Source file = output file activated
The Office Integration – Source page should remain activated.
15. Mobile use
A number of pages in the Document Management have been configured for mobile access.
Users have mobile access to the documents to which they have been granted permission. Members of the DMS Controlling user group can edit inspections and releases from the mobile pages.
16. PDF placeholders
From the Expert tab in the properties dialog of the application node, settings can be used to store placeholders which will be replaced with values from data fields when a PDF file is generated.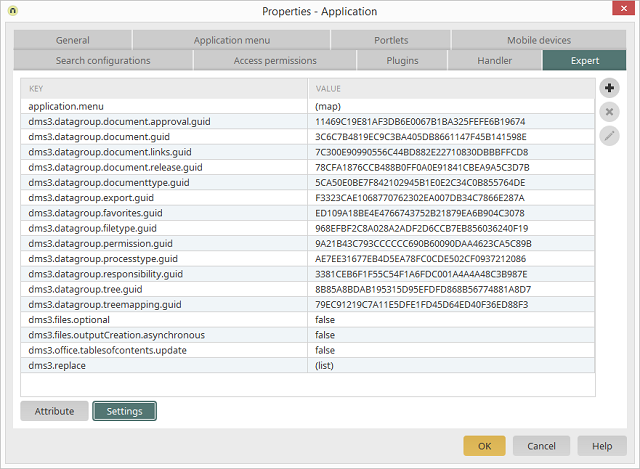
The key dms3.replace has the value list. Click on
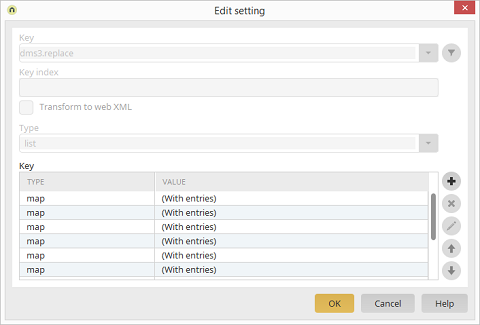
You can edit each value here by clicking on
You can reach the dialog for editing the guid and identifier by double-clicking on an entry or by clicking on
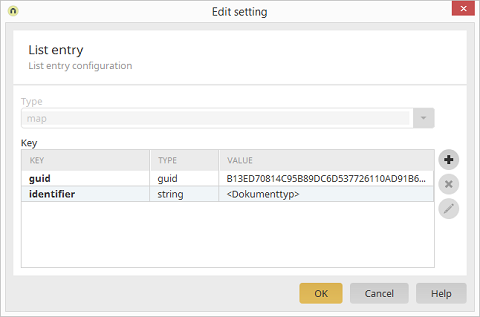
-
dms3.replace.<INDEX>.guid
(Data field from the Documents data group) -
dms3.replace.<INDEX>.identifier
Placeholder
Example:
1. Key: dms3.replace.1.guidType: guid
Value: DD7DE07E7D960BF7A7EA70D1B124E0525B89E2C0
2. Key: dms3.replace.1.identifier
Type: string
Value: <ReleasedOn>
In this case, <ReleasedOn> will be replaced with the release date in the PDF.
The following placeholders are pre-defined:
- <ReleasedOn>
- <DocumentTitle>
- <DocumentId>
- <VersionNo>
- <DocumentType>
- <ResponsiblePerson>
- <CreatedOn>
- <ProcessType>
- <AreaOfResponsibility>
- <Examiner>
- <Approver>
17. Troubleshooting
- Check whether the files jacob-1.18-M2-x64.dll and jacob-1.18-M2-x86.dll are present in the installation directory /bin/windows/amd64. If not, copy the files from the portal directory /lib/extensions/dms3 to the directory above. Once the file has been copied, restart the portal service.
- Check all of the entries in the DCOM configuration, as described here. Please make sure to always use one server administrator.
- Log in to the server with the user who is registered in the dcom.cnfg. Open Microsoft Word with this user. Please make sure to confirm all dialogs that may open. When Microsoft Word is reopened, these dialogs shouldn't appear again.
- Finally, check the Task Manager as to whether there are instances of Word that are not responding.
- If a certain format cannot be uploaded, please check the setting as to whether the format has also been selected.
- If a new user cannot create a document, please check whether they have a valid email address.
- If a new version cannot be created, please check whether the current version has been created in a format that Word can edit. For PDFs, you could encounter problems if you want to create a comparison file.
- If you cannot upload and transform one particular document, open it directly in Microsoft Word and try and create a PDF from it there. If it isn't possible here, you should revise the Word document.
-
If you've added a user group to a DMS group, the users here won't be found
because the filter isn't correct. Please adjust it as follows:
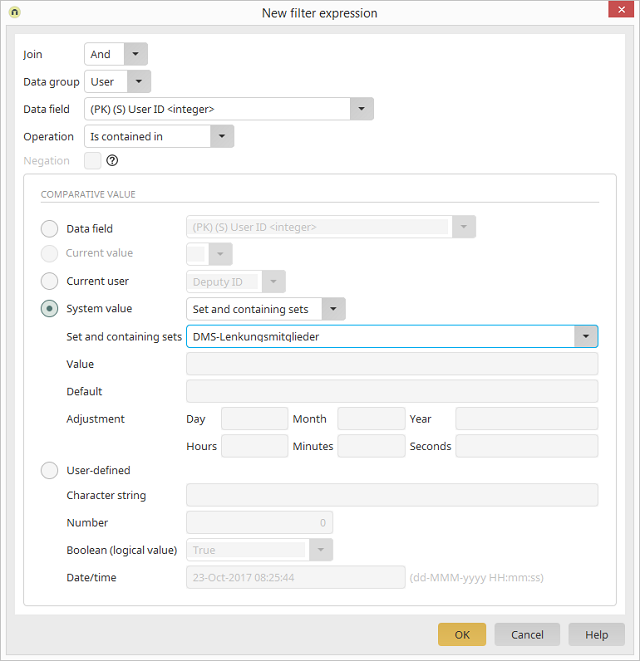
Search for every occurrence of the DMS-Lenkunsmitglieder and DMS-Redaktion groups. Use the GUID from the groups in the search. Once the application has been republished, users from these additional groups will also be shown. -
After updating Intrexx to version 8, please note that the application
needs to be adjusted. If you haven't customized the application, you
can download the latest version from the
Application Store.
Import this application and activate the option
Update existing applications.
Afterwards, you need to copy the current class from the application
package to your
portal directory
and replace the current ix-dms3.jar there.
After restarting the portal service,
no further errors should occur. If this isn't possible, you should still
re-download the application despite everything.
To begin with, replace the ix-dms3.jar with the file from the directory
and restart the portal service.
Begin making the described modifications once this is done.
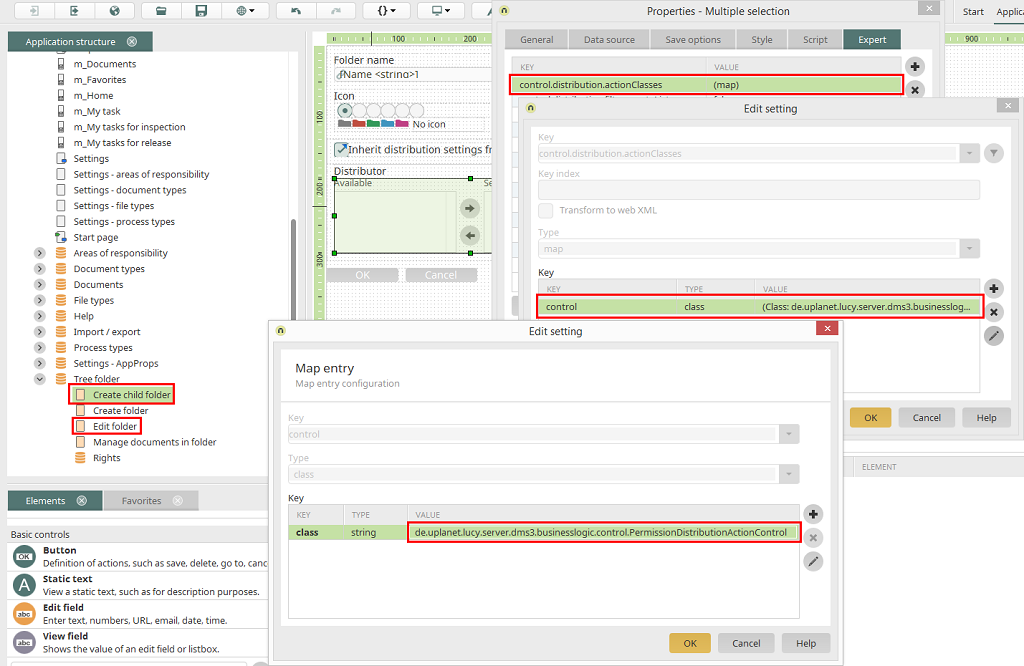
Afterwards, the setting
needs to be added on the Tree folder/Edit folder and Tree folder/Create child folder pages.<setting key="control.distribution.actionClasses" type="map"> <entry key="control" type="class"> <entry key="class" type="string" value="de.uplanet.lucy.server.dms3.businesslogic.control.PermissionDistributionActionControl"/> </entry> </setting>
Subsequently, search in the JavaScript for
and for$(grpDistributor).append('<input type="hidden" value="hidden" name="fr_' + grpDistributor.id.substr(3) + '"/>');
Comment out all of the appearances. In doing so, permissions should be inherited correctly in Internet Explorer.$(grpDistributor).find('[name="fr_' + grpDistributor.id.substr(3) + '"]').remove(); - If you still have problems, please check the areas of responsibility. Have inspectors and releasers been added here? If yes, do they all have a business email address?
18. Known error messages
Error messages (Excerpt):-
ERROR 2017-07-27 09:50:59,567 - de.uplanet.lucy.server.dms3.businesslogic.util.OfficePdfHelper[WebConnectorWorker-localhost:8102-3]
Can't map name to dispid: ProtectionType
com.jacob.com.ComFailException: Can't map name to dispid: ProtectionType
at com.jacob.com.Dispatch.invokev(Native Method)
at com.jacob.com.Dispatch.invokev(Dispatch.java:625)
at com.jacob.com.Dispatch.callN(Dispatch.java:453)
at com.jacob.com.Dispatch.call(Dispatch.java:529)
……
at de.uplanet.lucy.server.engine.http.HttpRequestProcessingPipeline.process(Unknown Source)
at de.uplanet.lucy.server.connector.web.WebConnectorWorkerThread.run(Unknown Source)
Caused by: de.uplanet.lucy.server.businesslogic.BlException: Creating pdf file from source file blabla.docx failed.
Please check the guidelines from point 2 to 4. -
ERROR 2017-08-22 08:50:20,177 - de.uplanet.lucy.server.engine.http.ProcessActionsIxFilter[WebConnectorWorker-localhost:8104-7]
Error while processing actions.
de.uplanet.lucy.server.businesslogic.BlException: Saving the document failed.
at de.uplanet.lucy.server.dms3.businesslogic.handler.DocumentPageActionHandler.processBefore(DocumentPageActionHandler.java:226)
at de.uplanet.lucy.server.businesslogic.rtappservices.AbstractRtApp.callBeforeActionHandlers(Unknown Source)
…
Caused by: de.uplanet.lucy.server.businesslogic.BlException: Creating pdf file from source file f31_0000_04_17_06_reisekosten.xltx failed.
at de.uplanet.lucy.server.dms3.businesslogic.rtdata.dao.DocumentDao._getPdfOutputFile(DocumentDao.java:1879)
at de.uplanet.lucy.server.dms3.businesslogic.rtdata.dao.DocumentDao.createOutputFile(DocumentDao.java:1430)
at de.uplanet.lucy.server.dms3.businesslogic.handler.DocumentPageActionHandler.processBefore(DocumentPageActionHandler.java:147)
... 33 more
Caused by: com.jacob.com.ComFailException: Invoke of: Open
Source: Microsoft Excel
Description: Die Open-Eigenschaft des Workbooks-Objektes kann nicht zugeordnet werden. (The Open property of the Workbook object cannot be assigned)
Please check the guidelines from point 3. -
Caused by: java.lang.IllegalArgumentException: Creating pdf file from file type jpg is not
supported.at de.uplanet.lucy.server.dms3.businesslogic.util.OfficePdfHelper.createPdf(Unknown Source)
Please check the guidelines from point 5. -
ERROR 2016-08-04 07:52:10,056 - de.uplanet.lucy.server.SystemLog[WorkflowTimerWorker-1470289489329]
wfGuid=E7E73D8097FE9135AC66024DE8F1FE5506850899 wfTitle="Dokumentenmanagement 3.0" wfRun=E7E73D8097FE9135AC66024DE8F1FE5506850899-1470289489331 wfObjGuid=A9CBAA306A72E02E6DC68E28D4B7635B2D5ECE6A wfObjClass=de.uplanet.lucy.server.workflow.action.SendMailWorkflowAction wfObjTitle="eMail-Aktion" Error while processing workflow.
de.uplanet.lucy.server.workflow.WorkflowException: Mail has no recipients.
at de.uplanet.lucy.server.workflow.action.SendMailWorkflowAction._processImpl(Unknown Source)
at de.uplanet.lucy.server.workflow.action.SendMailWorkflowAction.process(Unknown Source)
Please check the guidelines from point 6.