The OData Protocol
System requirementsCreate service
Quickstart
Server configuration
Relationships
Files
The Open Data Protocol (OData in the following) is a standardized web protocol. It supports the simple integration and manipulation of data and is significantly more conveniently designed than previous web services for developing web and mobile applications. OData is based on open web standards like HTTP, Atom Publishing Protocol and JSON, and like the World Wide Web, is constructed based on the REST (Representational State Transfer) architectural style. Complex database requests can be accomplished with OData using the URL alone. Consequently, OData is also known as "ODBC for the web". The Connector for OData allows data to be consumed and provided. When you provide data with the Connector for OData, the following features are available to serve OData services using Intrexx:
- Creation of OData services based on Intrexx applications and data groups.
- Publication and editing of data from Intrexx portals using OData services.
- Read and write access to data in real time.
- Execution of Groovy scripts and starting Intrexx processes.
- Access to binary files (documents, images, etc.).
- Data exchange between Intrexx portals.
- Various authentication methods that adhere to the users and permissions concept set by the portal.
System requirements
The Connector for OData supports version 2.0 of the OData specification. Some characteristics specified in version 3.0 and later may already be available, but are not officially supported. For problem-free communication between the provider and an OData client, the appropriate port(s) must be opened, depending on the connection type (HTTP / HTTPS). Furthermore, at least one Intrexx user is required for configuring and creating the service. This user must also possess all required rights to create OData services in the Integration module of the Intrexx Portal Manager.Create service
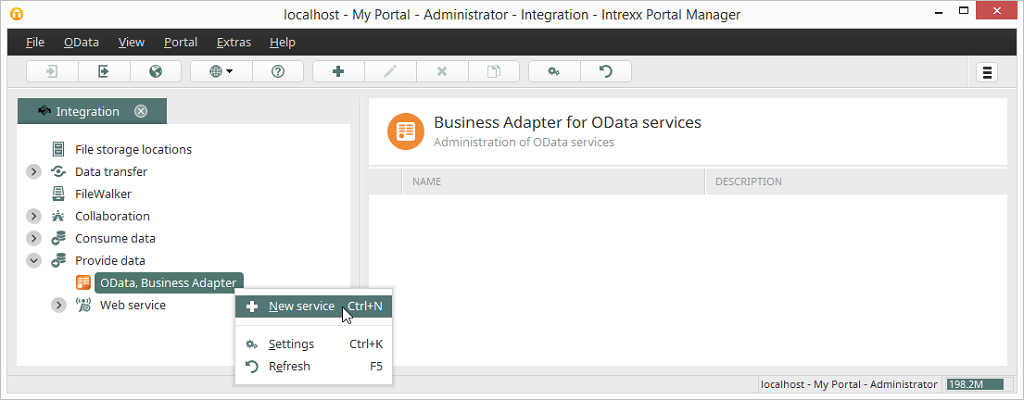
A new OData service can be configure from the context menu New service.
Quickstart
Here you'll be provided with an introduction to creating services with the OData Provider. Here, you will see how to serve appointments from the personal calendar in Intrexx for external accesses by using an OData service. The appointment data in the calendar can then be accessed from another portal by using the Connector for OData or another OData client of your choice. Create the new OData service.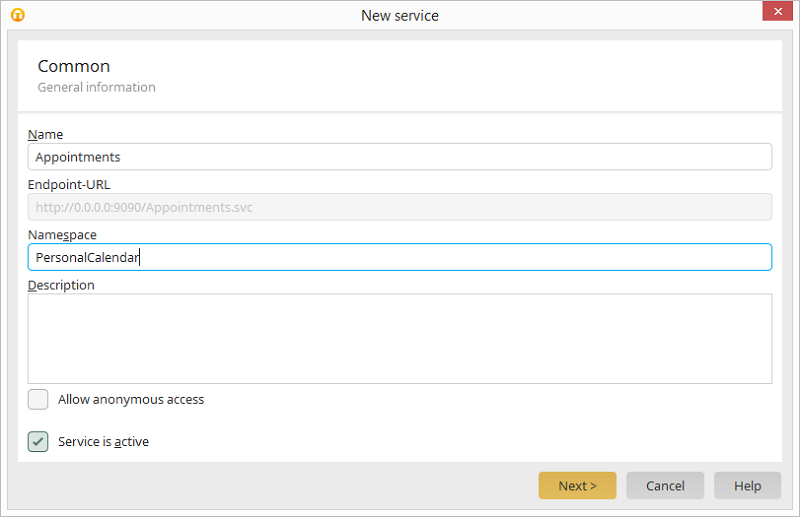
Enter the name Appointments and PersonalCalendar to the Namespace, and enter a description if you wish. Please make sure the setting of Service is active is selected. Now click on Next.
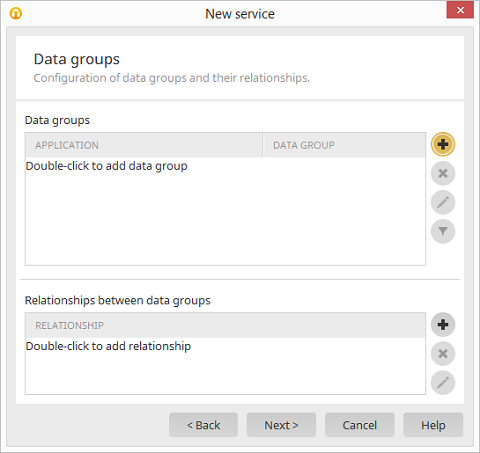
In the next step, you will select the data groups for the service. Click on
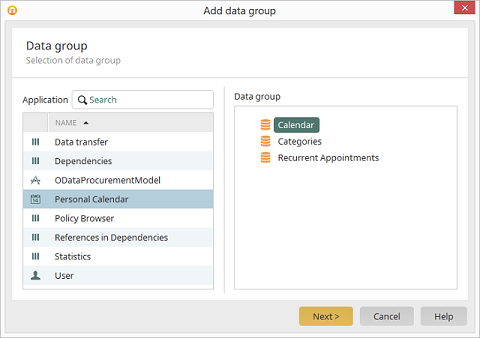
In the dialog Data Group, under the Personal Calendar application, select the Calendar data group.
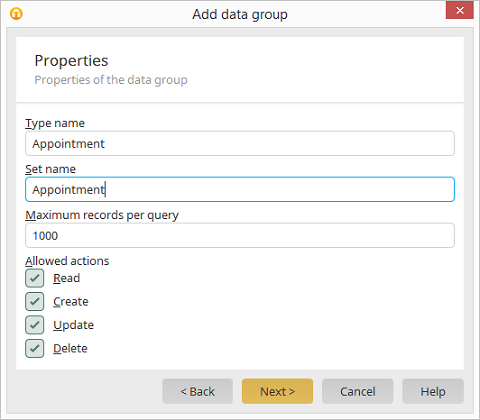
In the properties of the data group, enter Appointment under Set name and enable all permitted actions.
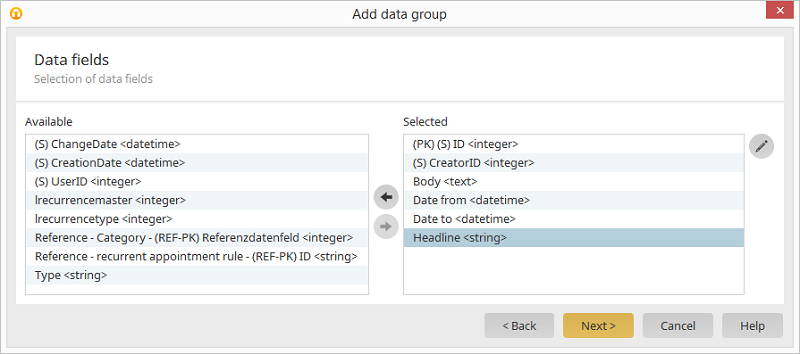
Now the data fields of the calendar data group will be selected that can be accessed using the OData service. To do this, select the ID, UserID, Description, Date From, Date To, and Title fields. Click on Next and then Finish.
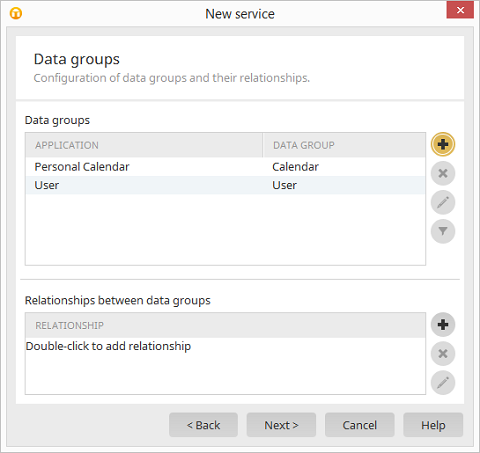
Add an additional Users data group from the Users application here, assign it the Type name and Set name of Organizer, and select the field names ID, Last name, and First name. Finally, click on Next and Finish. Your new service is now shown in the overview of available services.
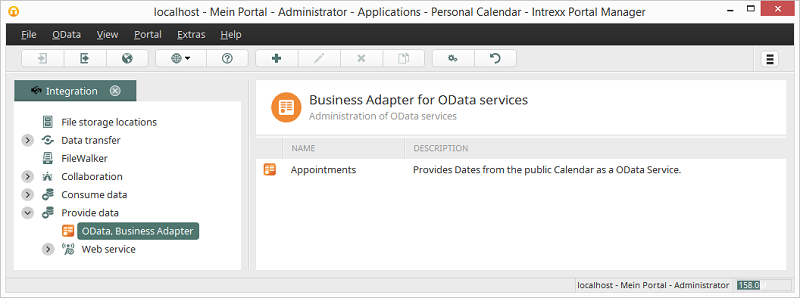
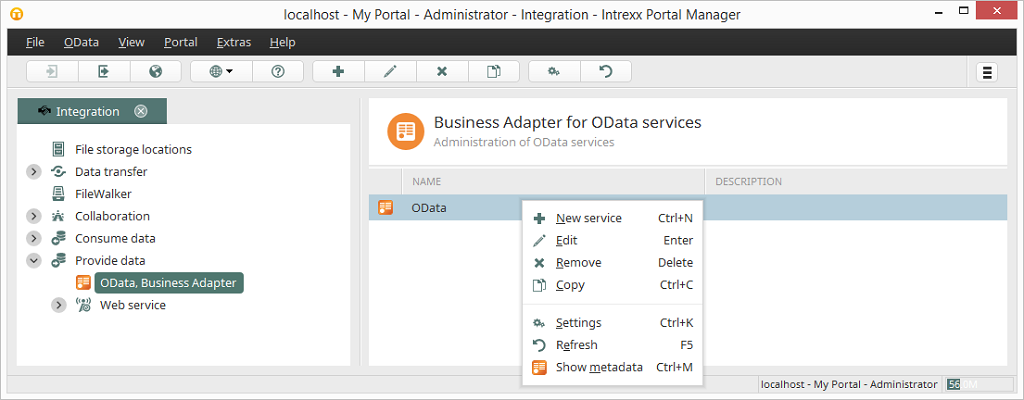
Before the service can be used, the OData Provider must be activated. To do this, open the context menu of the service and select Settings. The following dialog will open.
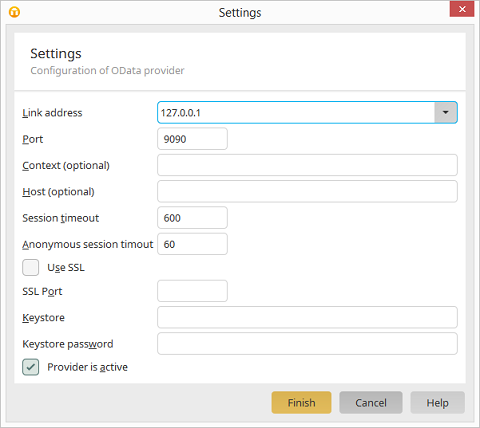
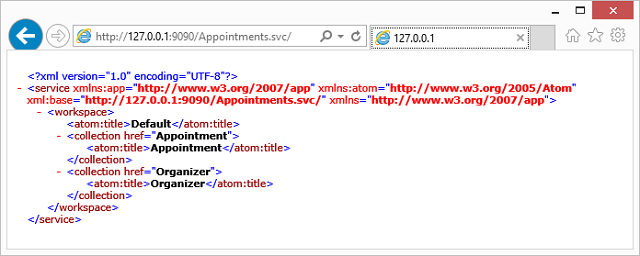
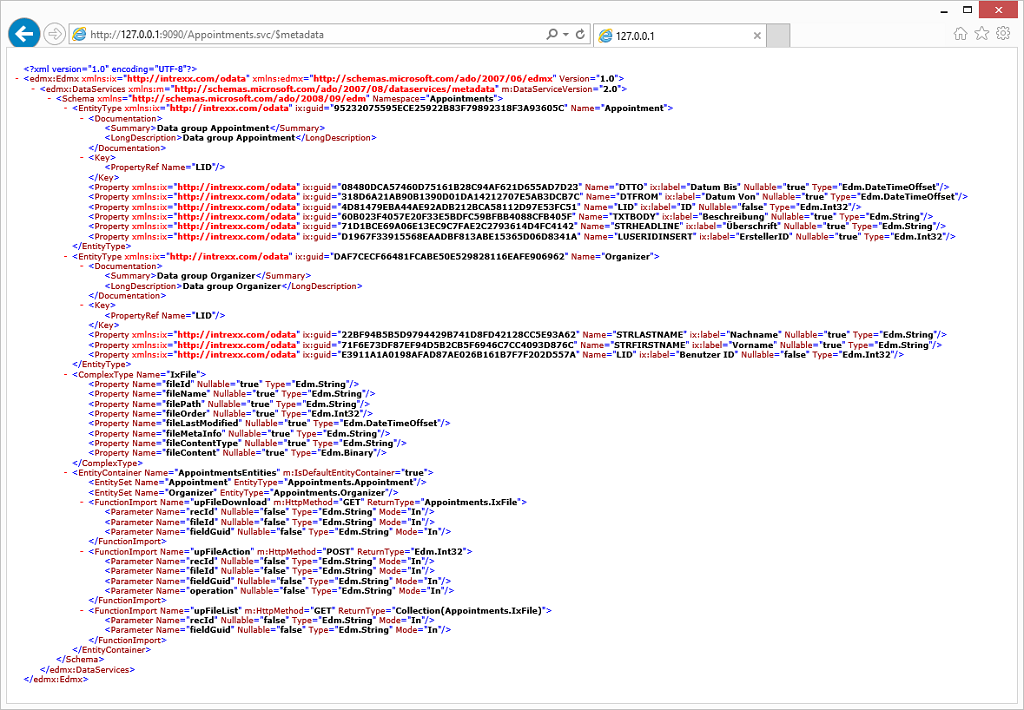
If necessary, select a different connection address and port that can be used to reach the service. Please make sure the port is not currently in use by another service and that it is not blocked by a firewall. Now select the Provider is active option and click on Finish. The OData server now starts and the service is automatically activated. To test the service, you can now open the address http://servername:port/Appointment.svc in a browser or use the context menu Show metadata of the new service in the Integration module. Replace servername and port with the host name and port of the computer on which the Intrexx Portal Server is running. The OData XML document that lists the service metadata if you used the first method is shown now. In the second, the two data groups Appointment and Organizer can be seen.
In the next step, the OData service can be consumed.
Using the service
With the prepared service, it is now possible, for example, to show appointments from an Intrexx portal in a second portal, without needing to directly access the database of the portal server. Additionally, you can access the appointments with any OData client or browser. In the following, it will be assumed that appointments need to be shown from another portal in a calendar. In order to follow along with the example, you can either create a second portal, or use the same portal in which the OData service was created. Now use the Portal Manager to connect to the portal in which the OData service will be consumed.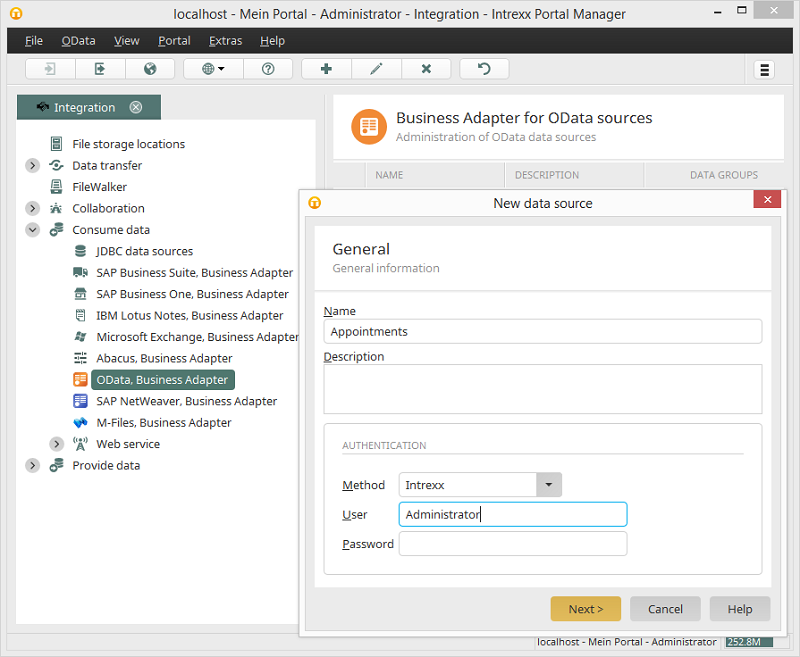
In the Integration module, open the context menu Consume data from Connector for OData. Select New data source and enter Appointments as the name. Select Intrexx for authentication and select a valid user from the portal that will be used to provide the service. Click on Next to continue. In the following step, create a new service by clicking
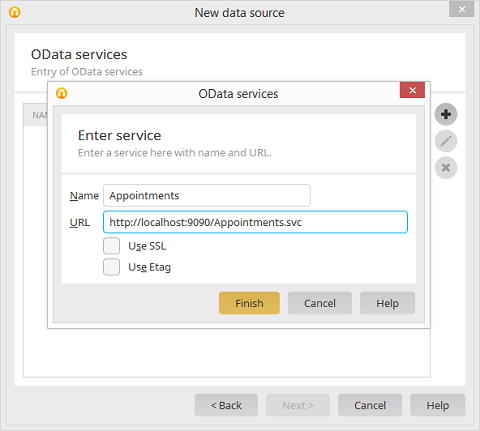
Enter Appointments as the name of the service and enter the address http://servername:port/Appointment.svc. Replace servername and port with the host name and port of the computer on which the Intrexx Portal Server is running. Click on Finish and Next until the connection test page appears.
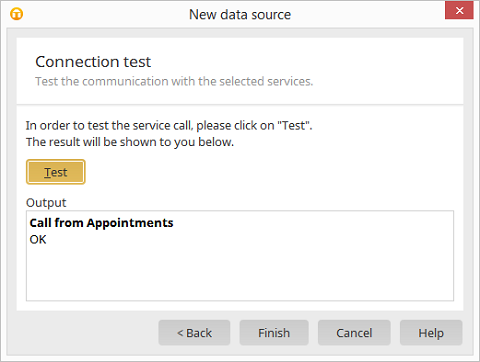
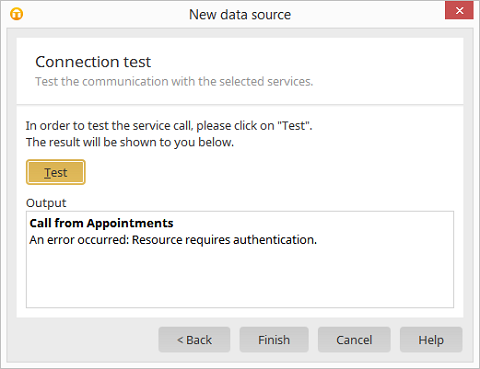
There, click on Test. If you have correctly entered the service URL and user, the OK message appears, with a wrong authentication the following message will appear:
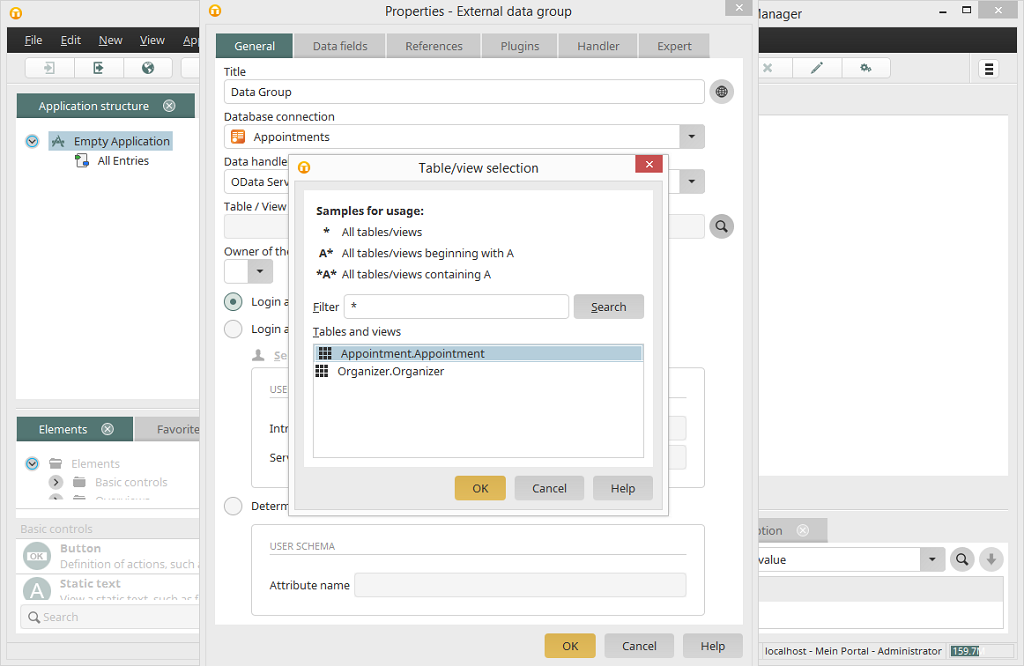
With the right authentication details the OData service client can now be used as an external data source in Intrexx applications. The appointments from the service portal now need to be displayed in a calendar view. To do so, create a new application based on the Empty Application template. Enter a name for the application and delete the preset data group. Next, create a new external data group and select Appointments for the database connection. click on the magnifier next to the table to
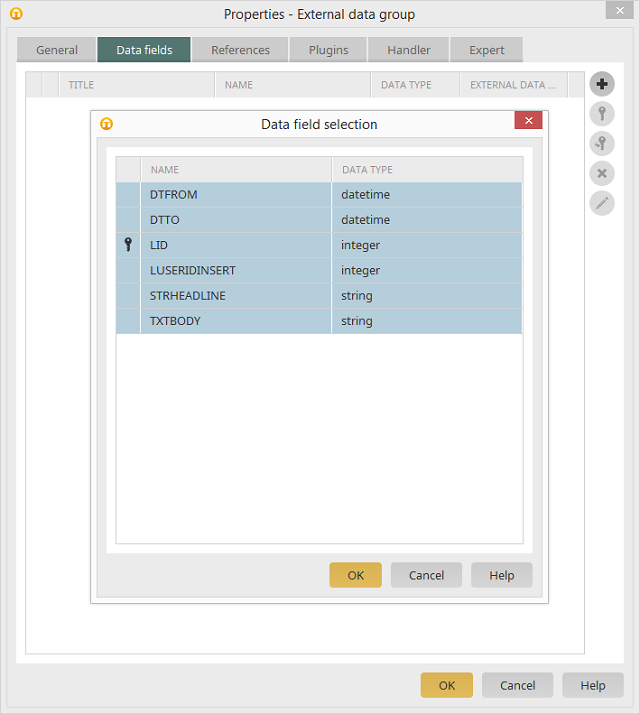
On the Data fields tab, select all available data fields and confirm the selection with another OK.
Now add a new calendar control to the overview page. In the following dialog, create a new calendar plugin, select the external data group, and link the properties with the fields from the OData data group.
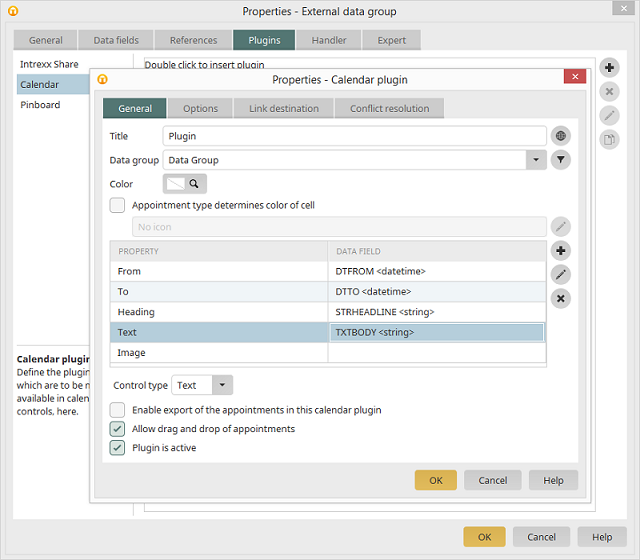
Confirm with OK and activate the plugin as a mandatory plugin. Now close the dialog with OK.
You can now publish the application. Appointments entered via a new application are saved by the OData service to the Calendar data group in the connected portal.
Server configuration
| OData services are connected to and served from Intrexx to a defined TCP/IP address and port. Before you can connect to an OData service, the OData server must be accordingly configured and activated using the context menu Settings. |
Information about the context menu functions can be found here.
Troubleshooting and the appendix can be found here.
Relationships
Relationships and references between Intrexx data groups are represented in OData as Associations and Navigation Properties. Both 1:1 and 1:n relations can be defined. Relationships with m:n cardinality can be represented with an m:n data group. Associations in OData define the relationships and their cardinality between Entity Types. Navigation Properties, on the other hand, add properties to the Entity Types, which can be used to navigate from a data record to a referenced data record without explicitly needing to add the foreign key or reference data fields to the Entity Type. The required settings for this are selected in the Relationships dialog. After the data groups that will be available to the service have been selected, the relationships between them can be defined.Files
In order to enable access from an OData service to files from file fields in data groups, the service must have the corresponding file field added to it as described previously. Since Intrexx provides additional metadata fields for file fields, a field with the complex data type IxFile is automatically added to the Entity Type for each file field. In addition to the file, this also contains metadata, such as the file name, type, and size. Furthermore, three functions are available to access files and manage them. There are two possibilities to access files, which are described in the following.Embedding files in OData feeds
The first possibility is to directly embed a file's contents as a base-64 encoded binary sting in an OData feed or entry. This is the simplest method to access a file, by providing it directly with the result of an OData request. The Connector for OData is able to extract the file's contents and save it locally as a file, and/or transfer it to another file field in a target file group and show the file in the browser using the Intrexx file control. It is also possible to save or update individual files using the file control. The disadvantage of this approach is that only one file can be provided for each file field. In the case of multiple file fields, this is always the first file, though a new file will always be added when saving. Also, the performance of the service will be significantly negatively impacted, since the file must first be completely loaded into the RAM in order to encode or decode it. For this reason, this method should only be used for smaller files.OData functions for files
A significantly more flexible and resource-saving possibility to access files using OData is by using the upFile functions, which are automatically available in every Intrexx OData service. They can be used to save and request files, and they provide full support for multiple file fields in Intrexx. The single disadvantage of the functions is that the file controls in Intrexx do not support this approach, which means that uploading and downloading files in Intrexx web applications will need to be realized on a project-specific basis with JavaScript or Groovy. The Intrexx OData service offers the following functions to manage files:- upFileList
The upFileList function returns a list of all files in a file field. The following parameters are expected:- recId: The primary key of the data record with the file field.
- fieldGuid: The field GUID of the file field.
- upFileAction
This function allows operations to be performed on multiple file fields. The following parameters are expected:- recId: The primary key of the data record with the file field.
- fileId: The ID of the file.
- fieldGuid: The field GUID of the file field.
- Operation: The file operation to be performed (either delete, moveUp, moveDown, moveTop, refreshMetadata, or refreshOrder).
- upFileDownload
Returns the contents of a file as a base-64 encoded string. The following parameters are expected:- recId: The primary key of the data record with the file field.
- fileId: The ID of the file.
- fieldGuid: The field GUID of the file field.
- upFileResource upload
Enables the stream-based upload of a file. This is the fastest and most resource-saving method to transfer files to the service. The uploadFile method expects the following parameters:- recId: The primary key of the data record with the file field.
- fieldGuid: The field GUID of the file field.
- fileName: The file name.
- contentType: The content type of the file.
- upFileResource - download
Enables the stream-based download of a file. This is the fastest and most resource-saving method to access files. The downloadFile method expects the following parameters:- recId: The primary key of the data record with the file field.
- fileId: The ID of the file.
- fieldGuid: The field GUID of the file field.
- disposition (optional): The content disposition header type (either inline or attachment).