Application Store - Area and Space Management
1. Installation
To use the application, you require at least Intrexx 8 with all Online Updates.1.1. Application

Import the file "buildingmanagement.zip" that was downloaded from the Application Store; this contains the application and process. Make sure the options "Import with application data" and "Import with permissions" are activated.
1.2. License
Then enter your license key for the application.1.3. Permissions
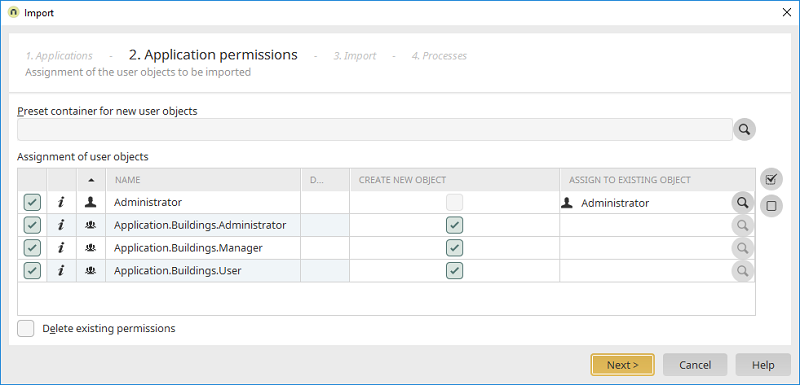
The application permissions can be assigned during the import. We recommended creating the user groups
- Application.Buildings.User (Group whose users have read access to the information for the building(s).)
- Application.Buildings.Manager (Group whose users have the ability to create and manage buildings and their floors, wings and rooms.)
- Application.Buildings.Administrator (Group whose users have the ability to define and mange object classes and object properties as well as make settings.)
1.4. Process
In the final step, import the included process.2. Foreword
Area and Space Management is a basis application for defining buildings and their floors and rooms. Stating the location is required for all sorts of data – e.g. the location of a server or machine, in which room the lighting is broken, location of an interoffice accident etc. This information is often managed redundantly. This application can manage buildings at various locations, whereby the organizational data from the Intrexx User Manager is used.3. "Settings" menu
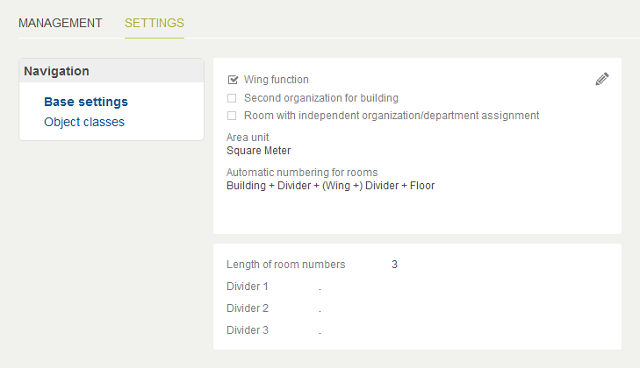
Here, the base settings required for running the application are configured and object classes and properties are managed. Click on
3.1. Base settings
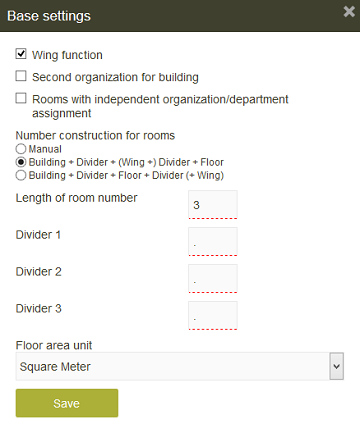
If you have buildings with wings, e.g. in an L, U, cross or star format, the "Wing function" can be activated. If you want to be able to assign a building to a second organization, as well as to a primary organization, you can activate the option "Second organization for building". In this case, a second drop-down list with the organizations from the organization tree in the User Manager will be provided. If rooms, independent of the building, should be assigned to an alternative organization and department, you can activate the setting "Rooms with independent organization/department assignment". The room numbering can be assigned manually or automatically by using the numbers of buildings, floors and wings. The settings for the room number length and the dividers can be configured with regards to this. The setting should be made once and not changed afterwards. The ability to adjust the formatting of existing data records is not provided. As the floor area unit, you can select between square meters and square feet. A conversion does not take place.
3.2. Object classes
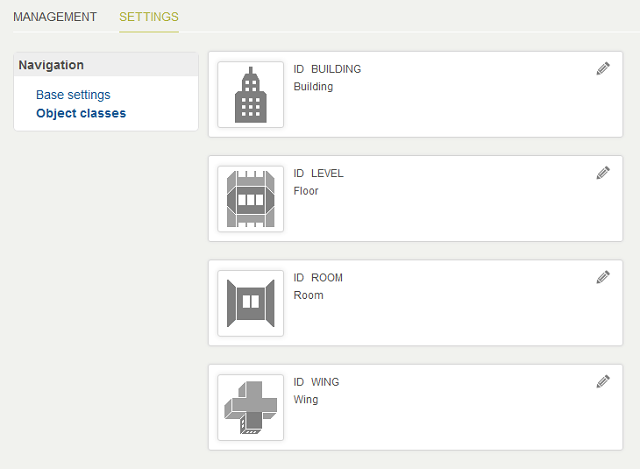
Four object classes are defined in the application: Building, Floor, Wing and Room. The descriptive IDs are important for filtering scenarios which is why these are shown here as well. Click on
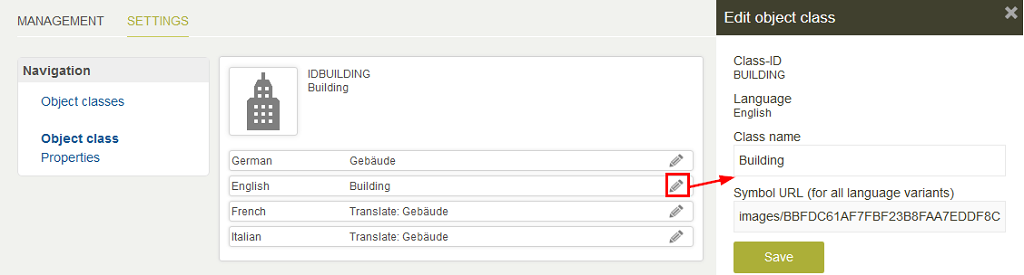
The object classes have multilingual labels. When creating an object class, all variants will automatically be generated based on the portal languages currently defined (the variants need to be translated afterwards). Entries that have not yet been translated have the prefix "Translate:". As well as a class label, a symbol URL with a relative link to a symbol (e.g. images/BBFDC61AF7FBF23B8FAA7EDDF8C1AFD9E8FF4771/Floor.png) is defined for each object class. These images are stored in the portal directory internal/application/store/<Application GUID>. The following construction applies to the symbol URL: Images/<Application GUID>/<Image filename>.
3.2.1. Properties
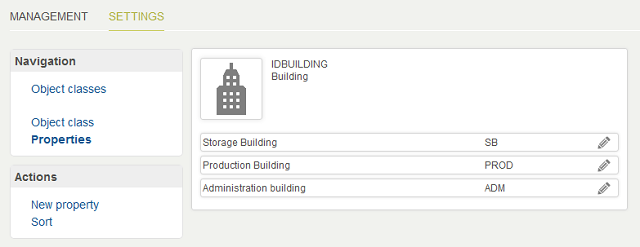
Once an object class has been selected, its properties can be edited. Click on
Building properties
For buildings, the object properties are used to define the building type and/or building function. Another use of this specification is possible.
Floor properties
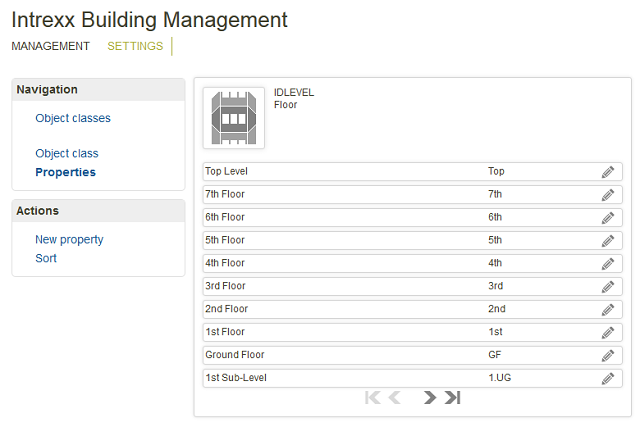
The properties for the floors are fixed and every type of floor needs to be defined here, which will be used for the definition of the building. The order should be defined accordingly from the basement floors via the ground floor and upper floors through to the top floor. Another use of this property is not possible.
Room properties
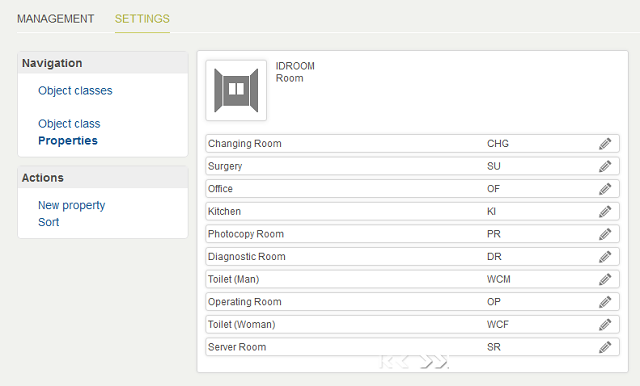
For rooms, the properties are used to define the room type and/or room function. Another use of this property is possible.
4. "Management" menu

4.1. Add new building
Click on "New building" to create a new building.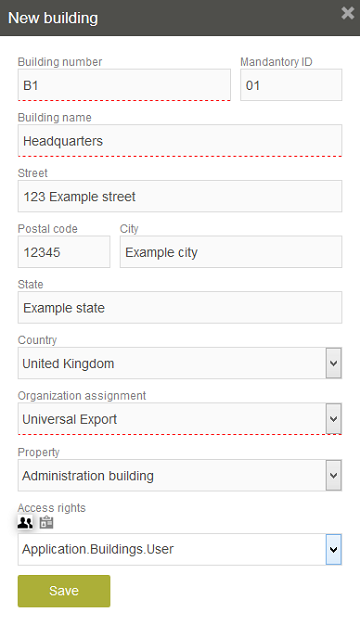
The building number can be alphanumeric. The name of the building is free choice and usually corresponds to the name on-site (e.g. in the reception area). The Client ID (Mandatory ID) is optional and can be used to save IDs from other systems such as SAP, for example. You can assign the building to an organization in the "Organization assignment". The secondary organization assignment is only possible if this setting has been activated on the Settings page. This assignment is optional, if, for example, there is a location clustering. This could mean that there is both United Planet Holding and United Planet Services for the location Freiburg. Both properties can be assigned in this case. The "Property" drop-down list entries come from the properties of the "Building object" type. The building type can be defined here, for example. Read access can be defined with a group or role. All of the roles and groups available in the portal are in this list. Please note: This setting is only for configuring the read access to this dataset. The generic access permission for the data group is defined in the application permissions. Furthermore, this information must be used accordingly in a filter.
4.2. Buildings
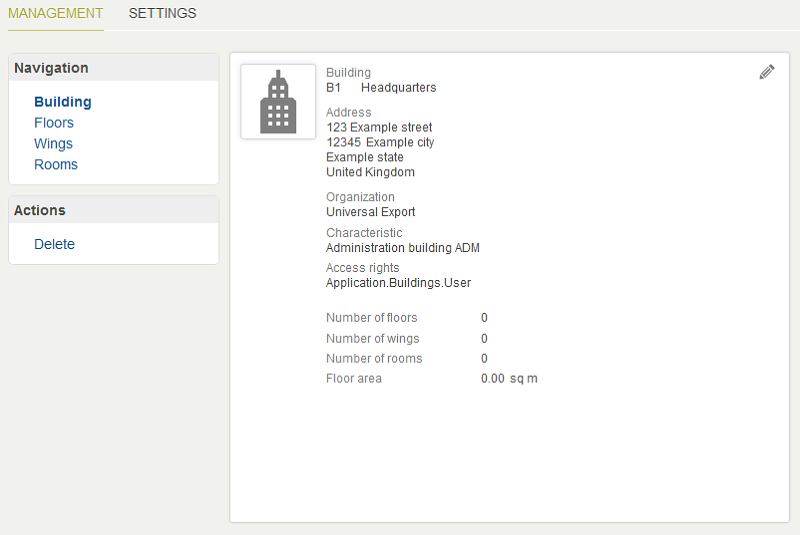
Once the building has been created, floors, wings and rooms can be defined via the links in the Navigation area on the view page for the building. The building information is shown on the right. Statistics about the number of floors, wings and rooms as well as the total area of the rooms in the building are displayed here.
4.3. Floors
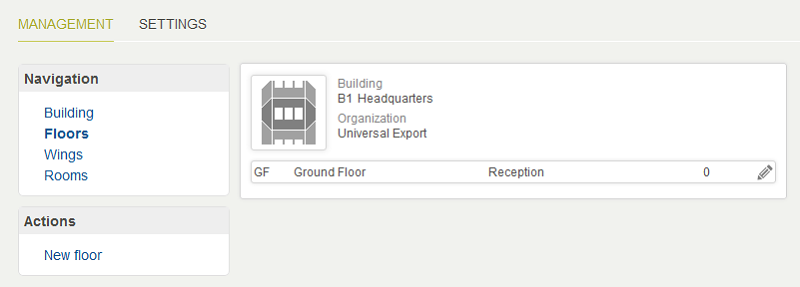
When defining a new floor via the "New floor" action, you need to define the floor property and number. A floor property can only be assigned once per building. Properties that have already been assigned are not shown in the drop-down list. The floor number can be entered alphanumerically. As the name, you can enter a description of the function or department (e.g. Research and Development).
4.4. Wings
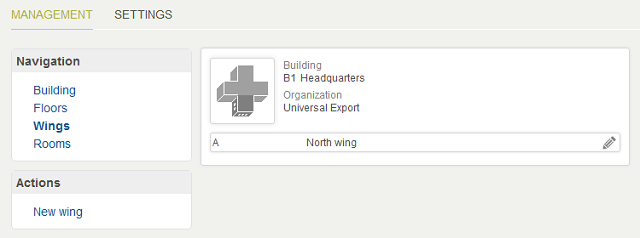
Wings can be defined for a building – provided this function has been activated on the Settings page. Wings allow you to construct buildings with an L, U, cross or star form. Click on "New wing" to define a new building wing. An alphanumeric wing number and name can be specified.
4.5. Rooms
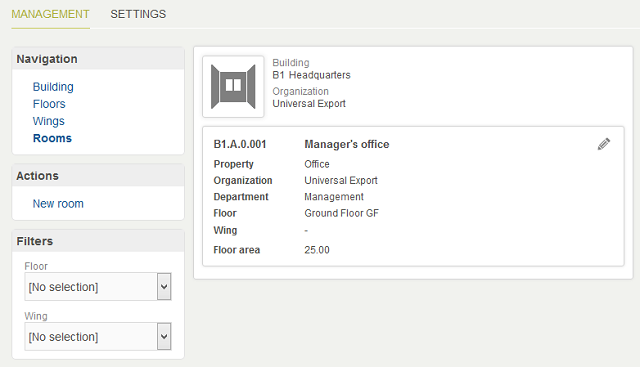
Rooms can be defined under the navigation point Rooms. New rooms are defined via the "New room" action. The rooms can be filtered by floor in the "Filter" area to only view rooms from a specific floor. The room name is free choice. The room then needs to be assigned to the respective floor. If the building wing function has been activated on the Settings page and wings have been defined for the building, then the room can also be assigned to a wing. Usually, the organizational assignment is inherited from the building. However, there are constellations where a room needs to be assigned to another location and department, e.g. if the central IT department (Holding) operates a server room in a subsidiary. To achieve this, the option "Rooms with independent organization/department assignment" needs to have been activated on the Settings page. The departments available for selection are based on the respective organization. The properties available for selection are taken from the properties of the "Rooms" object class. The type of room is usually defined here. The final entry is for the room size (area), this will be added to the total area for the building.
5. Use building information in other applications
The building information can be referenced by other applications and their data groups. The data about the buildings, floors, wings and rooms are administrated in one single data group (infrastructure). Here is a list of the relevant datafields:| Data field | Type | Description |
| STRID | String | Primary key (GUID) |
| STRPARENTID | String | Assignment key for floors, wings and rooms. Contains the primary key for the building. This value is null for buildings. |
| STRNAME | String | Name of the object |
| STRSHORTNAME | String | Short name of the object |
| LNUMBER | Integer | Object counter (for room number) |
| STRNUMBER | String | Object number (number for building, floor, wing, room) |
| STRORGID | String | Primary organization assignment. GUID of the organization object from the User Manager. |
| STRORGID2 | String | Secondary organization assignment. GUID of the organization object from the User Manager. |
| STROEID | String | Department assignment for rooms. GUID of the organizational unit from the User Manager. |
| STRACCESSTYPE | String | Permission type Group (GROUP) or Roll (ROLE). Is only used for controlling the selection for STRACCESS. |
| STRACCESS | String | GUID of a group or role which can receive read access to the building. |
| FLTSQUAREMETERS | Float | Area for rooms |
| LSORT | Integer | Object sorting (reserved for functions later) |
| LDUMMYCOUNTER | Integer | Always contains the value 1 |
| REF_CLASS | String | Reference to the object class |
| REF_PROPERTY | String | Reference to the object property |
| REFFLOOR | String | Reference to the floor (property). Only used for rooms. |
| REFWING | String | Reference to the wing. Only used for rooms. |
6. Filter for access permissions
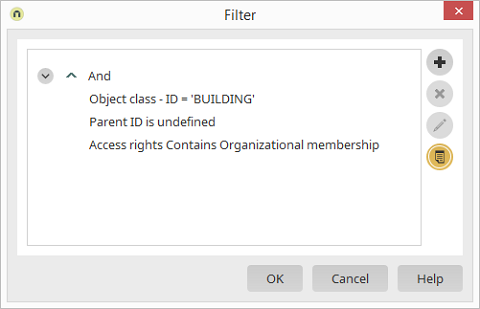
Read access to a building can be defined for a reference, e.g. in a drop-down list via the filter.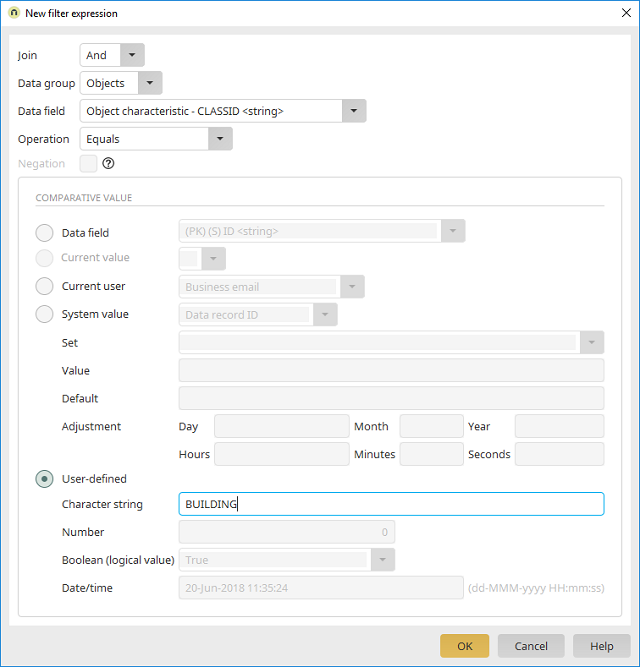
To begin with, the reference data field "Object characteristic CLASSID" needs to be compared with the value "BUILDING".
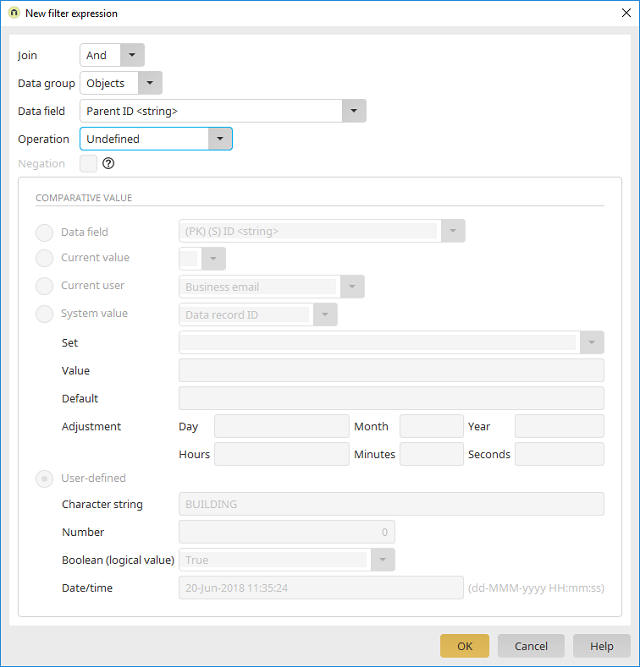
The Parent ID is null for all buildings (meaning undefined).
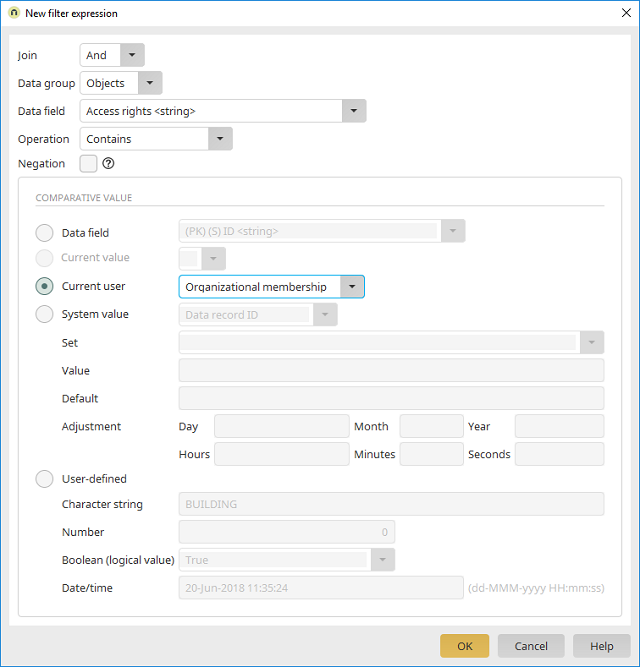
The "Access rights" field is compared with "Organization" field of the user using the the "Contains" operator.
When you create a filter, use the "Objects" data group as the source for all entries in the element. The primary key (STRID) is used as the data field. The same field is used for the sorting and the "Object characteristic - Characteristic" is used as the displayed value.
7. Dependency (Building-Floor-Room)
To implement a room selection step-by-step, three drop-down-lists can be used which filter one another based on a dependency. The building selection with the static filter from chapter above will serve as a basis.7.1. Dependency (Building-Floor)
To select the floor, the "Objects" data group is defined as the source of a drop-down list.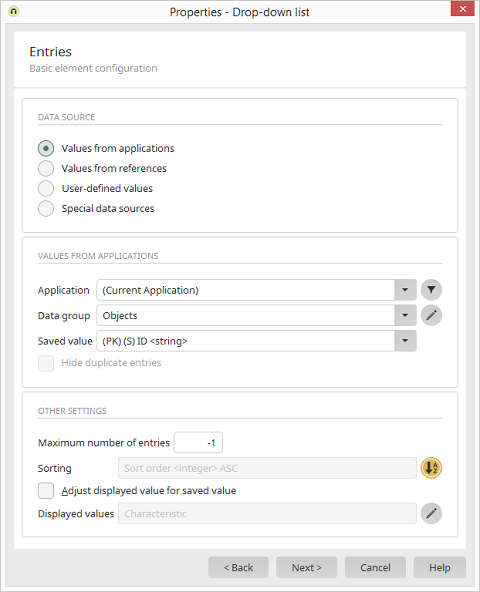
The primary key (STRID) is used as the data field and for the sorting. The displayed value is the "Object characteristic - Characteristic" field.
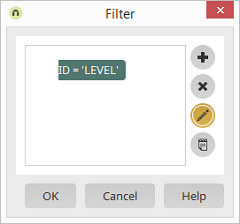
In the static filter, the "Object class – CLASSID" corresponds to the user-defined value "LEVEL".
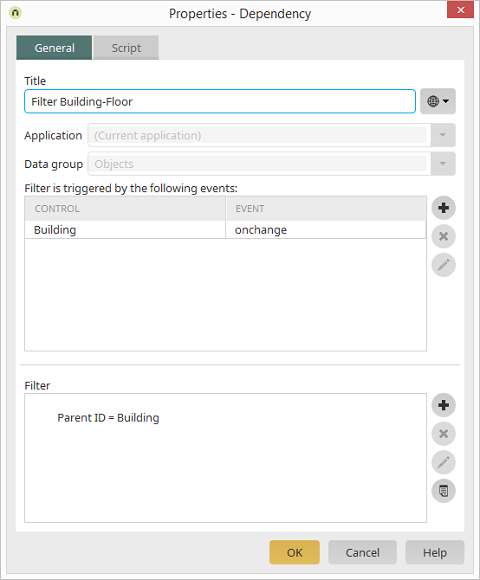
The dependency will respond to the onchange event from the "Building" drop-down list and the Parent ID has to match the primary key of the "Building" drop-down list.
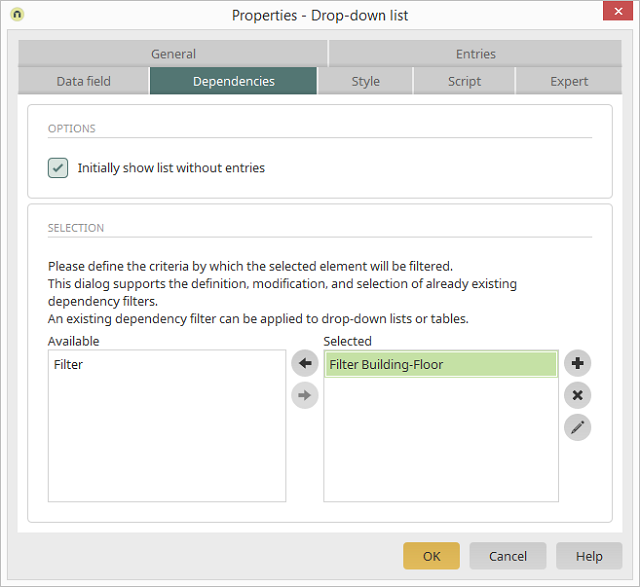
If you activate the option "Initially show list without entries", the connected floors will only be loaded in the drop-down list, once the building has been selected. Otherwise, all floors will be shown unfiltered which could mean that an incorrect floor can be selected.
7.2. Dependency (Floor-Room)
To select the rooms, the "Objects" data group is defined as the source of a drop-down list.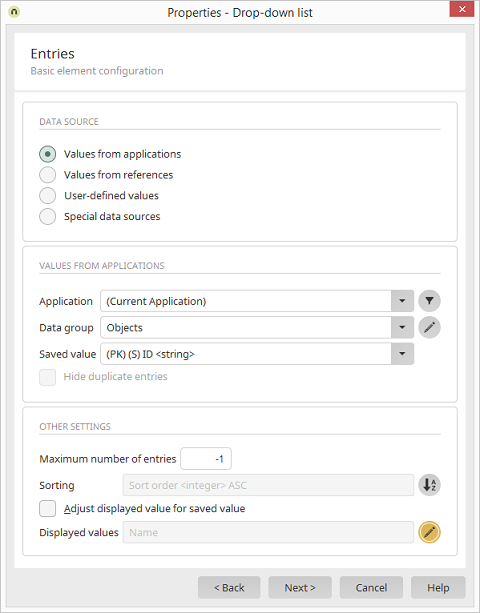
The primary key (STRID) is used as the data field and for the sorting. The displayed value is the "Object name".
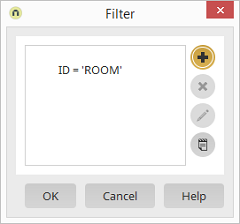
In the static filter, the "Object class – CLASSID" corresponds to the user-defined value "ROOM".
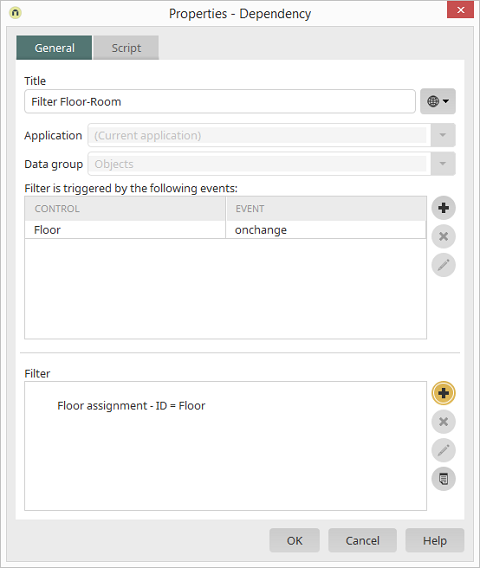
The dependency will respond to the onchange event from the "Floor" drop-down list and the Parent ID has to match the primary key of the "Floor" drop-down list. Activate the option "Initially show list without entries".
7.3. Location selection (for dependency)
A location selection can be implemented with a Velocity template or a drop-down list which accesses the DSOBJECT table from an external data group. However, the Intrexx Velocity API provides the corresponding objects and methods for this. The following Velocity template is added to a page via a VTL Include element. An string edit field in the hidden area (no data field link) serves as a recipient for the GUID of the selected organization and can be configured in a dependency. The GUID of the edit field must be added to the line "var oGuid = getElement("GUID_TARGETFIELD");" in the Velocity template#set( $l_iCounter = 1 )
#set( $DsFilter = $DS.selectFilter())
#set( $DsContainer = $DS.getContainer())
$DsFilter.reset()
$DsFilter.orderByName()
$DsFilter.setMaxTreeLevel(100)
#set($OEList = $DsContainer.getFullTree($DbConnection, $DsFilter))
#if( $OEList.size() > 0)
<select class="Dropdown_Standard" id="ID_LIST_FILTER_ORG"
name="Department" size="1" style="width: 100%;"
onchange="getOEOrgGuid(this)">
<option id="ID_FILTER_ORG_0"
value="">#GET_COMMON_FILTER_EMPTY_ENTRY()</option>
#foreach($OE in $OEList)
#set($TypeKey = $OE.getType().getTypeKey())
#if($TypeKey == "ORGANIZATION")
<option id="ID_FILTER_ORG_${l_iCounter}"
value="$!OE.getGuid()">
$DefaultHtmlEncodingRenderer.writeOutput($Response.getWriter(),
$OE.getNameVH())</option>
#set($l_iCounter = $l_iCounter + 1)
#end
#end
</select>
#else
<b>The User Manager does not have an organizational structure!</b>
#end
<script type="text/javascript">
function getOEOrgGuid(p_oSelect)
{
var oGuid = getElement("GUID_TARGETFIELD");
var oSelectOrgunits = document.getElementById("ID_LIST_FILTER_OE");
if(p_oSelect.selectedIndex > 0)
{
var orgguid = p_oSelect.options[p_oSelect.selectedIndex].value;
oGuid.value = orgguid;
}
else
{
oGuid.value = "";
oSelectOrgunits.length = 0;
}
return true;
}