Advanced Techniques - Permission based data access
This workshops shows you how data records can be shown based on permissions. Sound Intrexx and SQL skills are a requirement. Make sure the expert options have been activated so that all of the dialogs explained in this example are available. United assumes no liability and does not provide support for errors caused by incorrect implementation.A common method to implement access authorization for individual records is to add an text data field to the data group, which contain the records that access should be restricted to, and to then assign user objects to this field using a distribution control. In a view table within an application, a filter is then be defined, which compares the currently logged-in user with the user objects saved in the text data field and checks whether this user is allowed to read the record. This type of filtering achieves the desired result for this use case, but it is not recommended in terms of performance. Especially in portals with a large number of users and groups, this may lead to very long loading times among others. Performance can be improved by carrying out a comparison with values in child data groups. In this cause, authorized user objects are saved in a child data group and assigned via a foreign key filter with a subselect.
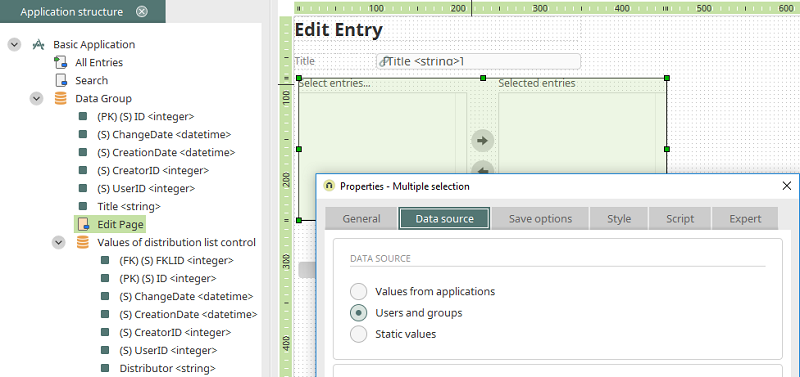
The multiple selection element can be used on any edit page in the data group that access permissions should be defined for. Select the option "Users and groups" on the Data source tab in the properties of the element.
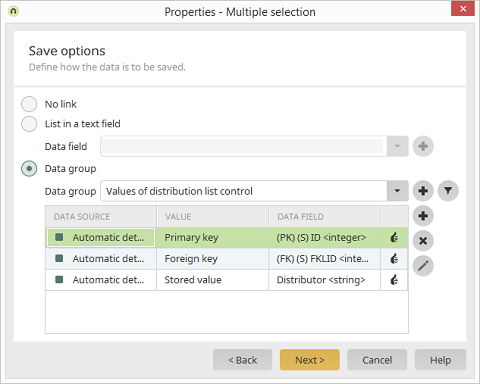
On the Save options tab, select the option "Data group". By clicking on
- PK – Primary key: The unique key of the new data group.
- FK – Foreign key: Corresponds to the primary key of the parent record that a permissions should be saved for.
- Distributor – Stored value: In each case, the user object that was selected by the user in the browser is saved in this data field. If multiple objects are selected, a corresponding number of records is saved in the child data group.
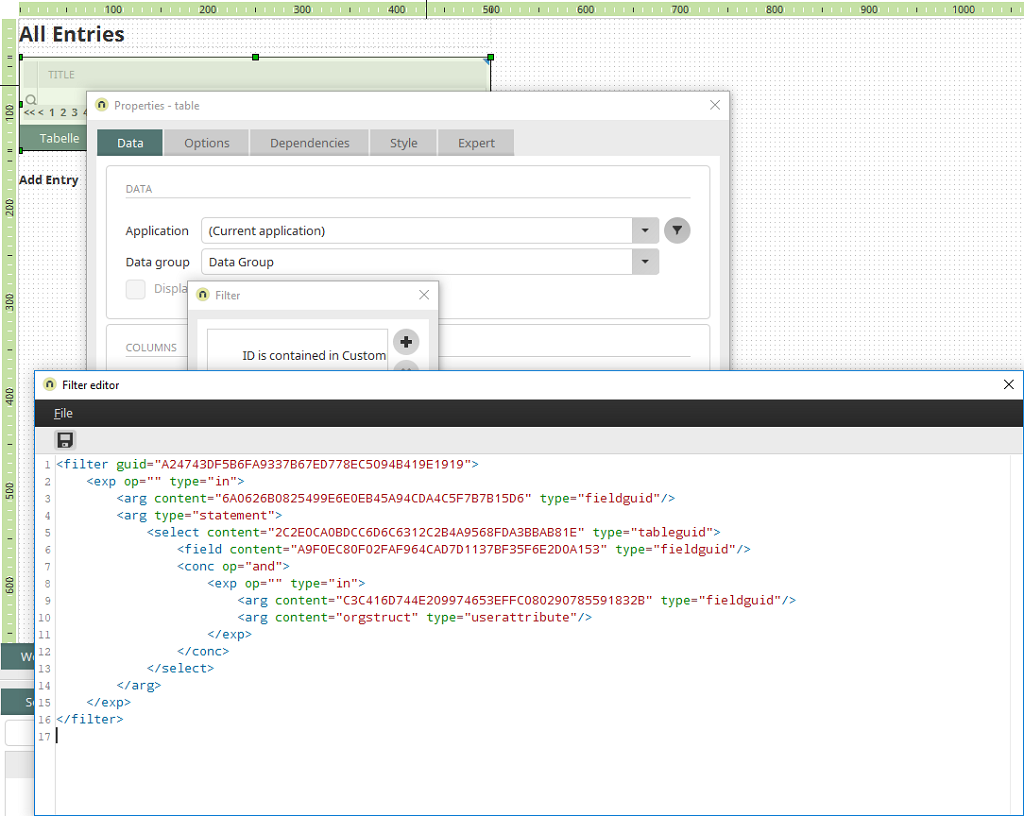
Switch to the page that contains the table to be filtered and open the properties of the table. On the Data tab, click on
<filter guid="EFC6F080E119E0D3AD5B8C9E0458EDE8054AFA0A">
   <exp op="" type="in">
      <arg content="GUID_1" type="fieldguid"/>
      <arg type="statement">
         <select content="GUID_2" type="tableguid">
            <field content="GUID_3" type="fieldguid"/>
            <conc op="and">
               <exp op="" type="in">
                  <arg content="GUID_4" type="fieldguid"/>
                  <arg content="orgstruct" type="userattribute"/>
               </exp>
            </conc>
         </select>
      </arg>
   </exp>
</filter>
- GUID_1: GUID of the primary key data field of the parent data group
- GUID_2: GUID of the child data group "Values of distribution list control"
- GUID_3: GUID of the foreign key data field of the child data group
- GUID_4: GUID of the "distributor" data field of the child data group